# Vanar

Welcome to Vanar Chain!

## What is Vanar Chain?

Vanar Chain is a new L1 blockchain solution designed for mass market adoption.

## New to Vanar Chain?

The [overview ](/getting-started/vanar/overview)will give you a quick understanding of Vanar Chain and the links below will guide you to building your first dApp with Vanar Chain.

## Getting Started

<table data-view="cards"><thead><tr><th></th><th></th><th></th><th data-hidden data-card-target data-type="content-ref"></th><th data-hidden data-card-cover data-type="files"></th></tr></thead><tbody><tr><td><strong>Overview</strong></td><td>Find details about Vanar Chain and it's promising features</td><td></td><td><a href="/getting-started/vanar/overview">Overview</a></td><td></td></tr><tr><td><strong>Why Vanar?</strong></td><td>Vanar's Philosophy</td><td></td><td><a href="/getting-started/why-vanar/our-philosophy">Our Philosophy</a></td><td></td></tr><tr><td><strong>Build on Vanar</strong> </td><td>Learn to build dApps on Vanar Chain</td><td></td><td><a href="/builders/for-developers">For Developers</a></td><td></td></tr><tr><td><strong>Developer Tools</strong></td><td>RPCs, Faucet, Block Explorers, SDKs and more</td><td></td><td><a href="/builders/for-developers">For Developers</a></td><td></td></tr><tr><td><strong>Run Nodes &#x26; Validators</strong></td><td>RPC and Validator nodes</td><td></td><td><a href="/nodes-and-validators/vanar-nodes">Vanar Nodes</a></td><td></td></tr></tbody></table>

## Need Help?

To contact us directly, email <support@vanarchain.com>. Thank you for being part of the Vanar Chain community!


# Overview

Emergence of Vanar Blockchain

Web 3 has been a minefield for mainstream. We have worked with brands and seen them struggle with poor products, platforms that have disappeared, or being forced into activations that don’t work for them.

We took our world class team, with years of experience in working with brands and corporates, and created a blockchain to take web3 into the mainstream.

Vanar addresses exploding markets with its innovative approach, including AI, Gaming, Real World Assets, Metaverse, Finance and more.

**Key Challenges:**

* **High Transaction Costs:** A major barrier, especially for microtransactions.
* **Sluggish Transaction Speeds:** Impeding real-time applications in gaming and other dynamic sectors.
* **Complex On boarding:** The intricacy of introducing new users to blockchain ecosystems.

## **Introducing Vanar**

Vanar is a world-class blockchain which underpins a suite of products and solutions addressing billion dollar markets.

Vanar has 5 key pillars in its design DNA, focused on the speed and scale that large scale brands need, powered by our token $VANRY

* **Ultra-Fast Transactions:** Attaining significantly enhanced transaction speeds.
* **Astonishingly Low Costs:** Reducing transaction fees to a mere $0.0005.
* **App Ecosystem:** A suite of apps, creating a one stop shop for mainstream brands
* **Scalability**: Allowing transaction sizes to address much larger customer bases that the mainstream requires
* **Eco Friendly**: A completely green blockchain

### **Our Expertise**

The Vanar team, with over a decade of experience in entertainment, gaming, VR, AR, AI and the metaverse, intimately understands the pain points of these industries. Our solution is tailored to resolve these issues, making Vanar the go-to infrastructure for mainstream markets.

## **Vanar : Redefining Blockchain Technology for a New Era**&#x20;

Vanar is at the forefront of blockchain innovation, addressing past shortcomings and forging a path for mass adoption. Its commitment to speed, cost-effectiveness, and ease of use makes us a catalyst for the next wave of blockchain innovation and accessibility.


# $VANRY Token

A Cornerstone in Vanar Blockchain Ecosystem for Developers and Web 3 Enthusiasts

**Overview**

In the heart of Vanar's blockchain ecosystem lies the native $**VANRY** token, a digital asset of versatility and indispensability. It's more than just a token; it's key in ensuring the platform's functionality and efficiency.

## **Utilities and Advantages**

* **Essential for Transaction Fees:** The $**VANRY** token is used to cover gas fees, facilitating smooth transactions and smart contract operations on the Vanar blockchain.
* **Staking Opportunities:** Token holders can stake $**VANRY**. Our dPOS staking mechanism provides necessary incentive to help ensure crucial role of network security.
* **Rewards for Validator Support:** By supporting validators through staking, token holders can earn a share of the block rewards, reinforcing their active role in the network's governance.
* **Block Rewards:** Validators are rewarded with $**VANRY** to help secure the network.
* **App Ecosystem:** $VANRY forms an integral role in our apps

### **Beyond Transactional Value**&#x20;

The $**VANRY** token is integral not just as a means of transaction but as a tool for community involvement, network security, and democratic decision-making within the Vanar ecosystem. It embodies utility, governance, and active participation.

### **Future Prospects**

As Vanar evolves, the $**VANRY** token's role will be increasingly vital in maintaining the platform's effectiveness, security, and commitment to mass adoption and user empowerment. It's not just a token; it's a gateway to shaping the future of the Vanar platform and its community.

## Native Token

$VANRY is the native gas token used to pay the transaction fees for transactions on Vanar blockchain.

## ERC20 Token

An ERC20 token was deployed to Ethereum and Polygon networks. This token acts as a wrapped version of $**VANRY** on key existing ecosystems to help support dApp interoperability between chains. The Vanar bridge allows the users of Native Token to bridge it o the supported chain and vice versa.&#x20;

**Ethereum Address:**&#x20;

0x8DE5B80a0C1B02Fe4976851D030B36122dbb8624

**Explorer Link:**&#x20;

<https://etherscan.io/address/0x8DE5B80a0C1B02Fe4976851D030B36122dbb8624>&#x20;

**Polygon Address:**

0x8DE5B80a0C1B02Fe4976851D030B36122dbb8624

**Explorer Link:**

[ ](https://polygonscan.com/address/0x8DE5B80a0C1B02Fe4976851D030B36122dbb8624)<https://polygonscan.com/address/0x8DE5B80a0C1B02Fe4976851D030B36122dbb8624>

## Where to buy?

**Decentralized Exchanges**

**Uniswap Pool:**&#x20;

<https://app.uniswap.org/tokens/ethereum/0x8de5b80a0c1b02fe4976851d030b36122dbb8624>

**Centralized Exchanges**

Confirmed major exchanges that currently support $**VANRY** token:&#x20;

* Binance
* Bybit&#x20;
* Crypto.com&#x20;
* Kucoin&#x20;
* Paribu&#x20;
* Gate
* MEXC
* Bitget&#x20;
* Ascendex

Keep an eye out for new exchanges in the future.


# The Vanar Foundation

The Vanar Foundation is responsible for overseeing and managing various aspects of the Vanar blockchain ecosystem. Vanar Foundation sits at the centre stage to oversee the development, management and growth of the Vanar ecosystem. Below are the key roles of the Vanar Foundation:

1. **Governance and Oversight**:
   * The Vanar Foundation serves as the primary governing entity responsible for setting the direction and policies of the Vanar blockchain network.
   * It establishes rules, protocols, and standards for network participation, consensus mechanisms, and governance processes.
   * The Foundation ensures that the Vanar network operates in a fair, transparent, and decentralized manner, while also upholding the principles and values of the ecosystem.
   * To encourage the inclusivity the Foundation welcomes reputable brands and entities to run the validator nodes to secure the network. The validators are selected via a [Proof of Reputation](/getting-started/why-vanar/proof-of-reputation) system that is governed by the Vanar Foundation.
2. **Network Development and Maintenance**:
   * The Foundation oversees the development, maintenance, and enhancement of the Vanar chain protocol.
   * Also the Vanar Foundation allocates resources, such as funding and grants, to support projects and initiatives that contribute to the growth and sustainability of the Vanar ecosystem.
3. **Community Engagement and Support**:
   * One of the key roles of the Vanar Foundation is to engage and support the community of users, developers, projects and other stakeholders within the Vanar ecosystem.
   * It organizes events, meetups, and conferences to foster collaboration, networking, and knowledge sharing among community members.
   * The Vanar Foundation has greater vision to provide educational resources and support services to assist users and developers in understanding and utilizing the Vanar blockchain effectively.
4. **Partnerships and Collaborations**:
   * The Foundation establishes partnerships and collaborations with other organizations, projects and protocols to promote adoption, innovation, and interoperability within the Vanar ecosystem.
   * Collaborations includes strategic alliances with technology companies, academic institutions and governmental bodies to advance the goals and objectives of the Vanar network and public good.
5. **Sustainability**:
   * The Vanar Foundation ensures to run a sustainable and eco friendly blockchain and it advocates the usage of green energy to maximum extent possible. For the same reasons Vanar's complete infrastructure runs on Google Cloud Platform's data centers which are running on green energy.
   * Also the Vanar Foundation ensures any validator who becomes part of the ecosystem must run the infrastrucure running on green energy with zero carbon footprint.
6. **Grants and Funding**
   * The Vanar Foundation supports different projects and protocols to build on Vanar which have potential impact to grow the Vanar ecosystem.
   * The Vanar Foundation also provides operational support to the projects building on Vanar on technical, advisory, marketing and business development areas.

Overall, the Vanar Foundation plays a central and multifaceted role in guiding the development, governance, and sustainability of the Vanar blockchain network, while also fostering a vibrant and inclusive community around it.


# Why Vanar?

Learn more about why Vanar is the blockchain of choice for the mainstream

<table data-view="cards"><thead><tr><th></th><th></th><th></th><th data-hidden data-card-target data-type="content-ref"></th><th data-hidden data-card-cover data-type="files"></th></tr></thead><tbody><tr><td>Our Philosophy</td><td></td><td></td><td><a href="/getting-started/why-vanar/our-philosophy">Our Philosophy</a></td><td></td></tr><tr><td>Eco-friendly green-chain</td><td></td><td></td><td><a href="/builders/for-developers">For Developers</a></td><td></td></tr><tr><td>Fixed Fees</td><td></td><td></td><td><a href="/getting-started/why-vanar/fixed-fees">Fixed Fees</a></td><td></td></tr><tr><td>Why L1?</td><td></td><td></td><td><a href="/getting-started/why-vanar/why-l1">Why L1?</a></td><td></td></tr><tr><td>Why Choose Us?</td><td></td><td></td><td><a href="/getting-started/why-vanar/why-choose-vanar">Why Choose Vanar</a></td><td></td></tr><tr><td>Proof of Reputation</td><td></td><td></td><td><a href="/getting-started/why-vanar/proof-of-reputation">Proof of Reputation</a></td><td></td></tr></tbody></table>


# Our Philosophy

Building the Future of Blockchain

**Vanar is a new kind of L1 blockchain solution designed for mass market adoption.**

Incorporating 5 years of experience with top brands, we've developed a one-stop solution to eliminate the key barriers to technology adoption. Our EVM chain streamlines the developer experience and focuses on removing obstacles to adoption.

**Vanar** has 5 Key Pillars in its design DNA, focused on the mainstream and scale:-

* High Speed
* Built for scale
* App Ecosystem
* Eco friendly
* Low cost

#### High Speed

We believe that blockchain technology should be super fast, enabling near-instant transaction confirmations. To achieve this, we've customized the core Ethereum code to ensure that a new block is mined every 3 seconds. We understand that real-time transaction processing is vital for applications that require speed and efficiency.

**Built for scale**

High speed, low fees, google undersea cable latency from infrastructure to optimizing how fees work we've worked on optimizing Vanar to begin the journey of mainstream adoption.

#### App Ecosystem

For a blockchain to grow, Vanar targets developers and encourages growth while at the same time ensuring the right dapps for relevant use cases are developed. We encourage this and are actively researching and providing grants for applications we believe will maximize Vanar's growth.

The Vanar ecosystem is supported at a national level, across incubation centers and universities in multiple countries in Asia and Africa.

#### Eco friendly

Vanar is working with Google to innovate in green technology use across its entire chain infrastructure:

* Consensus mechanism optimized for energy efficiency&#x20;
* Nodes powered by Google's renewable energy data centers
* High speed under the sea network
* Carbon footprint tracking and offsets
* 100% recycled energy

**Low Cost**

Price fixed to 1/20th of a cent per transaction, with cost tiers for larger transactions. Zero-cost option for companies and brands via account abstraction advances.

<br>


# Green Chain

Pioneering a Greener Blockchain Future

Vanar Chain's commitment to green energy, a cornerstone of our mission, is now strengthened by our collaboration with Google's infrastructure. We believe the future of blockchain is not only in its potential to revolutionize industries but also in its ability to do so sustainably. This partnership allows us to leverage Google's advanced green technologies, reinforcing our narrative that blockchain should minimize its carbon footprint.

In an energy-demanding world, it's crucial to find solutions that protect our planet. Vanar Chain, in partnership with Google, stands as a symbol of this harmony between blockchain technology and environmental consciousness. Our blockchain infrastructure, supported by Google's green technology, is designed for efficiency and sustainability. This integration significantly reduces energy consumption, making our chain a leading environmentally-friendly option.

We support renewable energy sources like solar, wind, and hydropower, and align our operations with sustainability principles. This initiative, boosted by our partnership with Google, not only reduces our carbon emissions but also fosters the growth of the green energy sector. Our vision extends beyond blockchain innovation; we aim to be pioneers in environmental stewardship.

Additionally, we're committed to running our infrastructure entirely on renewable energy. Our partnership with Google, among others, is a step towards this goal, with more details to be shared as we approach our mainnet launch.

Our dedication to green energy is more than a technological choice; it's a mindset driving all our decisions. We aim to inspire the blockchain community and the broader tech industry towards eco-friendly practices. With the support of Google's infrastructure, we can redefine blockchain as a symbol of sustainability and innovation.

As we face the threats of climate change, Vanar Chain, in collaboration with Google, is proud to be part of the solution. We invite everyone to join us in forging a greener, sustainable future where blockchain and the environment coexist in harmony.&#x20;

Vanar Chain: Pioneering a sustainable blockchain ecosystem with Google's green technology.


# Fixed Fees

Vanar Chain's operational framework is based on a fixed transaction fee model, ensuring stability and predictability for users, protocols, and projects. This model facilitates a dependable environment, crucial for handling the dynamic fluctuations in token prices and network demand common in the blockchain landscape.

Key advantages of this approach include:

1. **Equitable Playground**: Unlike systems like Ethereum's priority fee structure, Vanar's First-In-First-Out model ensures fair and sequential transaction processing for all users.
2. **Cost Projection**: Fixed fees with a clear tiered structure allow for precise budgeting and planning for projects and end-users, fostering transparency and trust in the ecosystem.
3. **Informed Decision-Making**: This model aids projects in strategic planning, optimizing resource allocation, and enhancing scalability and user experience.
4. **Operational Cost Quantification**: Businesses can accurately analyze and manage financial commitments, improving budget optimization and operational efficiency.
5. **Consistent Performance During Peak Times**: Vanar's scalable infrastructure ensures stable fixed fee transactions, even during high network demand, offering a reliable platform for continuous operation.

By adopting this model, Vanar positions itself as a sustainable, fair, and predictable blockchain ecosystem, attractive to a diverse range of projects. Refer to [Fixed Fees](/getting-started/vanar-architecture/fixed-fees) under Vanar architecture section of the documents to learn more on how fixed fees actually works from technical perspective.


# Why L1?

Building a new EVM compatible layer 1 chain vs. using rollups or other scaling solutions: The Vanar Approach

The decision to create a new EVM-compatible Layer 1 blockchain, as opposed to relying on Layer 2 solutions like rollups, is a strategic choice that aligns with Vanar's specific objectives and the unique challenges it aims to address. Here are some key reasons behind this decision:

#### Cost-Effectiveness

While Layer 2 rollup solutions offer significant scalability and cost advantages over the base layer, they may not always provide the extreme cost-effectiveness required for certain applications. Vanar aims to serve use cases such as gaming and microtransactions, where extremely low transaction costs are paramount. Layer 2 solutions may still involve transaction fees, which, while lower than Layer 1 fees, can be prohibitive for these applications.

#### User Experience

Vanar's focus on mass adoption includes users who may not be willing to pay any transaction fees. For applications like games and microtransactions, a seamless and feeless experience is essential to attract and retain users. Layer 2 solutions, while improving scalability, may not completely eliminate transaction fees.

#### Speed

Vanar prioritizes speed and transaction throughput. While Layer 2 solutions can significantly increase the number of transactions per 2 seconds, Vanar's custom Layer 1 solution can be tailored for even greater transaction speeds, which is crucial for real-time applications and microtransactions.

#### Independence

By building its own Layer 1 chain, Vanar gains full control over the network's features, governance, and security. This level of autonomy is essential to meet its objectives effectively and customize the platform to cater specifically to its target use cases.

#### Accessibility

A new Layer 1 blockchain can be designed with user-friendly onboarding processes and lower entry barriers, ensuring that billions of users can access the Vanar ecosystem seamlessly. This accessibility can be more challenging to achieve within existing Layer 2 solutions, which may still rely on the base Ethereum layer for security and transactions.<br>

In essence, Vanar's decision to create its own Layer 1 blockchain is rooted in the need to provide a cost-effective, user-friendly, and highly scalable solution tailored to specific use cases, such as gaming and microtransactions. While Layer 2 solutions like rollups offer significant benefits, they may not always align perfectly with the ultra-low-cost and high-speed requirements of VANAR's chosen applications. By building a customized Layer 1 solution, VANAR can optimize its platform to meet these unique needs and foster mass adoption.


# Why Choose Vanar

Where Speed, Affordability, Ease and Decentralization Unite

Vanar Chain offers a compelling array of features that make it the ideal choice for developers and projects seeking to build decentralized applications (dApps) across a spectrum of use cases. Here are some of the prominent reasons why Vanar stands out as a reliable and trustworthy blockchain platform:

#### Scalability

Vanar is designed to handle a high volume of transactions, making it well-suited for use cases with substantial demands, such as gaming and payment gateways. With the capability to process thousands of transactions per second, it ensures a smooth and responsive user experience, even during peak usage.

#### Ultra-Low Transaction Costs

Vanar's commitment to low transaction fees, with costs as low as $0.0005 per transaction, ensures that dApps built on the platform can offer cost-effective solutions to end-users. This is particularly critical for microtransactions and applications that require feeless experiences. [Learn more](/getting-started/why-vanar/fixed-fees) about the benefits and rationale behind fixed transaction fee.

#### Speed

The platform's exceptional speed allows for real-time transaction processing, an essential feature for applications that demand instantaneous interactions, like gaming and payment gateways.

#### User-Friendly Onboarding

Vanar understands the importance of welcoming new users into the blockchain ecosystem with ease. The user-friendly onboarding process ensures that individuals and businesses can smoothly transition into the world of blockchain and dApps.

#### Security

Built as a fork of Ethereum, Vanar inherits the battle-tested security features of the Ethereum network. This ensures that dApps built on Vanar can rely on a robust security foundation.

#### Customization

Vanar has made customizations to the Ethereum codebase to optimize performance and affordability, making it adaptable to various use cases and projects.

#### Independence

By creating its own Layer 1 chain, Vanar gains independence and control over the network's features, governance, and security, allowing it to tailor the platform to the unique needs of its users.

#### Commitment to Green Energy - ZERO carbon footprint

At Vanar Chain, our core mission is centered around green energy. We firmly believe that the future of blockchain should be sustainable, with minimal environmental impact, while retaining its power to transform industries and empower individuals.<br>

In summary, the Vanar Chain offers a comprehensive package of features that position it as a trustworthy and reliable blockchain platform for dApp development. Its focus on scalability, low costs, speed, and user-friendliness, alongside its commitment to security and decentralization, makes it a compelling choice for projects and developers seeking a blockchain solution that can deliver on their unique use cases with trust and confidence.


# Proof of Reputation

In our innovative blockchain ecosystem, the Vanar Blockchain has introduced a new protocol called Proof of Reputation (PoR). This protocol reflects Vanar’s vision of mainstream adoption and is designed to enhance the security, trustworthiness, and reliability of our network by ensuring that only reputable entities can become validator nodes. Additionally, we employ a decentralized proof of stake model, allowing token holders to delegate their stake to a node and earn yield. This system forms the core of the Vanar Blockchain.

### What is Proof of Reputation?

Proof of Reputation is a consensus mechanism where the eligibility of node validators is determined based on their established reputation. Unlike traditional Proof of Work (PoW) or Proof of Stake (PoS) systems, which rely on computational power or financial stake, PoR emphasizes the credibility and trustworthiness of the participants.

### Key Features of Proof of Reputation

#### Brand Recognition

* Only entities with a recognized brand or a well-established presence in their industry are eligible to become node validators.
* In the early stages of Vanar mainnet, brands which have a significant web2 or web3 infrastructure presence will be prioritized.
* This ensures that validators have a reputation to uphold, which incentivizes honest and reliable behavior.

#### Transparency and Accountability

* Validators are publicly known and accountable to the community, enhancing transparency and reducing the likelihood of malicious activities.
* Each validator's identity and reputation details are available allowing for community scrutiny.

#### Security and Trust

* By relying on reputable entities, the network inherently becomes more secure as these entities are less likely to engage in fraudulent activities that could harm their brand.
* The reputation-based selection reduces the risk of Sybil attacks, where an entity creates multiple fake identities to gain disproportionate influence.

#### Decentralized Trust

* While ensuring that only reputable entities can validate transactions, the protocol maintains decentralization by allowing a diverse set of known brands from various industries to participate.
* This diversity prevents centralization of power to whales and ensures a balanced distribution of trust and responsibility across the network.

#### Stake Delegation and Yield

* Token holders can delegate their stake to validator nodes, participating in the consensus process and earning yield.
* This decentralized proof of stake model incentivizes broad participation and supports the network’s security and efficiency.

### How Proof of Reputation Works

#### Validator Selection

* Potential validators must apply and provide evidence of their brand reputation, such as market position, customer reviews, and industry certifications.
* The Vanar Foundation assesses the reputation of applicants based on predefined criteria.
* Factors affecting the reputation include the entity's history, transparency, and community feedback.
* The Vanar Foundation assigns an internal score to Validators.

#### Ongoing Evaluation

* Validators are continuously monitored based on their performance and adherence to network rules, and wider behaviour.
* Poor performance or misconduct can lead to a reduction or disqualification from the validator role.

#### Rewards and Incentives

* Validators earn rewards for their contributions to maintaining the network, with higher reputation scores leading to higher rewards.
* This creates a positive feedback loop, encouraging validators to maintain and improve their reputation.

### Benefits of Proof of Reputation

* **Enhanced Security:** With reputable entities validating transactions, the network is less prone to attacks and fraud.&#x20;
* **Improved Trust:** Users and stakeholders have greater confidence in a network governed by well-known and trustworthy entities.
* **Efficient Governance:** Reputation-based validation streamlines decision-making processes and ensures that only qualified entities have influence over the network.
* **Stakeholder Participation:** The decentralized proof of stake model allows token holders to actively participate in the network, earning yield and contributing to its security.

By implementing the Proof of Reputation protocol and integrating a decentralized proof of stake model, the Vanar Blockchain aims to build a more secure, trustworthy, and reliable blockchain network that leverages the strengths of reputable entities and broad stakeholder participation to achieve consensus and maintain the integrity of our ecosystem.

\
\ <br>


# Vanar Architecture

Built on top of Ethereum - Elevating Ethereum's Foundation

Vanar's architectural strength lies in its strategic alignment with the robust Ethereum infrastructure. Leveraging the well-established and secure Ethereum codebase, Vanar carefully infuses tailor-made customizations to actualize its core objectives. These objectives pivot around three pivotal pillars: speed, affordability, and the pivotal drive for widespread adoption.

#### The Cornerstones of Vanar's Infrastructure

At the heart of Vanar's architecture lies the GETH implementation, serving as the bedrock of its execution layer. This powerful foundation is seamlessly complemented by a unique hybrid consensus mechanism, the Proof of Authority (PoA) that is governed by Proof of Reputation (PoR). This dynamic mechanism paves the way for the addition of new node validators through an inclusive validator election process. The synergy between these components creates a resilient and high-performing ecosystem that can accommodate a diverse range of applications.

#### The Art of Precision

Each customization applied to the GETH codebase is a testament to Vanar's commitment to perfection. The modifications are executed with meticulous precision, and their implementation is subjected to a rigorous audit process. This uncompromising approach ensures that every change not only aligns seamlessly with Vanar's objectives but also upholds compatibility with the broader blockchain ecosystem. Vanar's architecture embodies a relentless pursuit of excellence, aiming to set new standards in the blockchain landscape.


# Protocol Customizations

GETH code for Vanar chain

Vanar chain's adaptation of the [Ethereum GETH](https://geth.ethereum.org/) (Go-Ethereum) codebase is driven by precise business objectives, primarily centered around accelerating transaction confirmations and reducing transaction costs. Here, we provide a comprehensive breakdown of the pivotal alterations applied to the GETH codebase to align seamlessly with Vanar's strategic goals

<table data-view="cards"><thead><tr><th></th><th></th><th></th><th data-hidden data-card-target data-type="content-ref"></th></tr></thead><tbody><tr><td><strong>Native Gas Token</strong></td><td>$VANRY the native gas token for Vanar chain</td><td></td><td><a href="/getting-started/vanar-architecture/protocol-customizations/native-gas-token-usdvanry">Native Gas Token ($VANRY)</a></td></tr><tr><td><strong>Fixed Fees</strong></td><td>Fixed fees for transactions</td><td></td><td><a href="/getting-started/vanar-architecture/protocol-customizations/fixed-fees">Fixed Fees</a></td></tr><tr><td><strong>Transaction Ordering</strong></td><td>First in first out model</td><td></td><td><a href="/getting-started/vanar-architecture/protocol-customizations/transaction-ordering">Transaction Ordering</a></td></tr><tr><td><strong>Block Rewards</strong></td><td>$VANRY as block reward to the validators</td><td></td><td><a href="/getting-started/vanar-architecture/protocol-customizations/block-rewards">Block Rewards</a></td></tr><tr><td><strong>Block Time</strong></td><td>Faster due to quick block time</td><td></td><td><a href="/getting-started/vanar-architecture/protocol-customizations/block-time">Block Time</a></td></tr><tr><td><strong>Block Size</strong></td><td>For higher throughput</td><td></td><td><a href="/getting-started/vanar-architecture/protocol-customizations/block-size">Block Size</a></td></tr></tbody></table>


# Native Gas Token ($VANRY)

To empower the Vanar ecosystem

Vanar chain introduces its very own native gas token, VANRY, as a fundamental component of its ecosystem. VANRY takes on the crucial role of facilitating the payment of gas fees for transactions conducted on the Vanar Chain.&#x20;

&#x20;This native gas token not only streamlines the process of transaction fee settlement but also contributes to the overall efficiency and affordability of interacting within the Vanar ecosystem. With VANRY, users can navigate the blockchain with confidence, knowing that their gas fees are easily managed, and the familiar ETH-like experience extends to Vanar, creating a sense of continuity and familiarity for blockchain enthusiasts and developers alike.


# Fixed Fees

A locked fees model for transactions

To make the transaction costs more predictable and practical for many projects where transaction fees matters as a fundamental concern, the Vanar chain has introduced a pioneering approach to the transaction fees with the implementation of a fixed fee model. This innovation ensures that transaction costs remain stable, unswayed by the specific type or magnitude of the transaction being conducted. The overarching objective is to provide users with a seamless and predictable experience, as transaction fees for 90% of transaction types are designed to stay in the vicinity of $0.0005.

This fixed fee structure represents a significant leap in the world of blockchain technology. By maintaining consistent and affordable transaction fees, Vanar chain stands as a beacon of user-friendliness and financial predictability within the blockchain ecosystem. Users can conduct transactions with confidence, knowing that the cost remains the same, regardless of the nature of their engagement with the network. This enhancement not only simplifies the user experience but also offers a powerful tool for businesses and developers to create frictionless, cost-effective blockchain applications and services.


# Transaction Ordering

First In First Out Model

Vanar's approach to transaction fees adopts a fixed fee model, ensuring that transactions are processed on a straightforward "first come, first serve" basis. This deliberate choice aligns with our commitment to providing a level playing field for all participants, regardless of the size or scale of their projects.

The fixed fee model is designed to promote fairness and inclusivity within the Vanar ecosystem. By adhering to a first-come, first-served processing mechanism, every participant, whether a small-scale project or a larger initiative, is afforded an equal opportunity to have their transactions included in the blockchain.

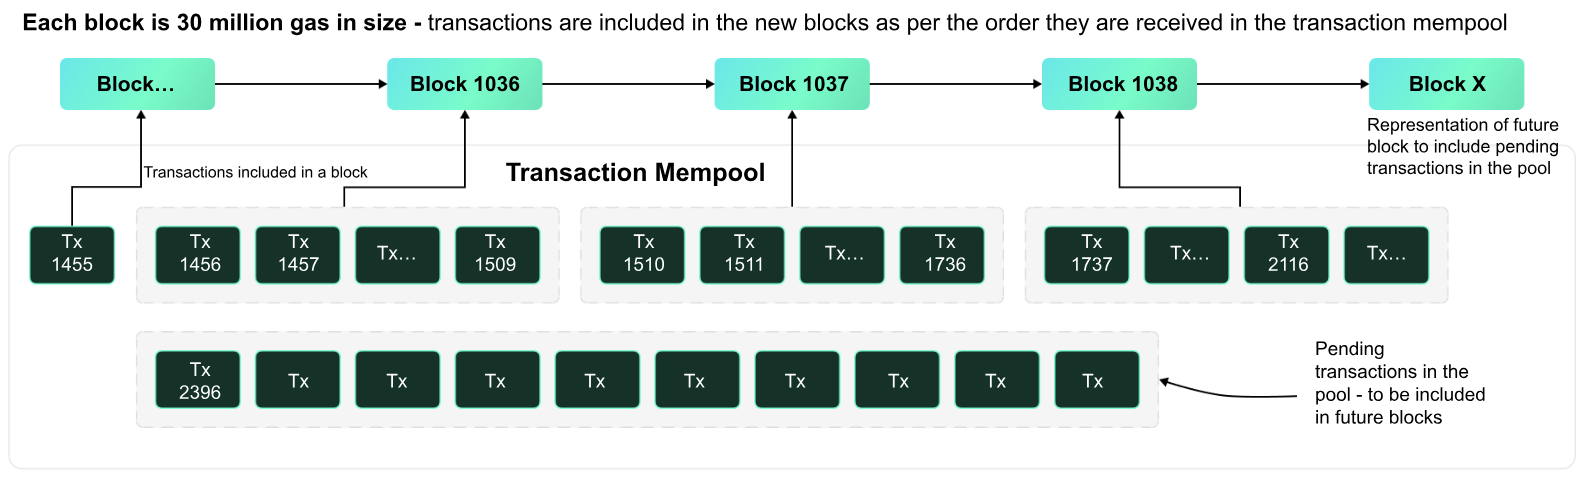
To implement this approach, the protocol is structured to ensure that the validator responsible for sealing a block follows the chronological order of transactions as they are received in the transactions mempool. This means that transactions are processed in the sequence in which they enter the system, enhancing transparency and equitable access to the blockchain's processing capabilities.

In essence, Vanar's commitment to a fixed fee model and a first-come, first-served processing order underscores our dedication to fairness, openness, and providing an accessible platform for projects of all sizes within the blockchain ecosystem.

<figure><img src="https://content.gitbook.com/content/gUode1088gE1VUSxIx5w/blobs/QDddmjvK19HUjue6NFGt/image.png" alt=""><figcaption><p>Transaction Ordering - First In First Out Model - Transactions are ordered and included in blocks based on time and nonce</p></figcaption></figure>

<br>


# Block Rewards

Validator rewards to secure the network

The $VANRY token is meticulously designed with a maximum supply capped at 2.4 billion tokens, establishing a clear and finite limit to its availability. Notably, the token issuance mechanism is structured to ensure that, aside from the initial supply minted as genesis, all additional tokens will be generated as block rewards.

To maintain transparency and predictability in token issuance, a predefined rate has been established. This rate dictates the pace at which the remaining $VANRY tokens will be minted, with each new block produced over a span of 20 years contributing to this incremental issuance. This extended timeframe not only allows for a controlled and gradual release of tokens but also introduces a measured and sustainable approach to token distribution over an extended period.

The allocation of tokens as block rewards serves multiple purposes. Firstly, it incentivizes network participants, such as validators by rewarding them with newly minted tokens for their contributions to the network's security and functionality. Secondly, this gradual issuance mechanism helps prevent abrupt fluctuations in token supply, fostering a stable and well-balanced ecosystem.

VANRY token inflation is set at an average rate of 3.5% over 20 years. It should be noted this is an average, with the release of tokens in Y1 and Y2 being higher to accomodate the developer ecosystem, airdop and preminting of some Y1 staking rewards.&#x20;

By structuring $VANRY's tokenomics in this manner, we aim to promote long-term sustainability. The carefully planned issuance schedule aligns with the project's vision for stability, fairness, and the creation of a robust economic foundation for the $VANRY token within the blockchain ecosystem.

Validators who participate in the production of the blocks to validate the transactions earn $VANRY as block rewards.

<br>


# Block Time

To achieve fast transaction speed

The significant hurdle faced by contemporary blockchains lies in their inherent slowness, posing a considerable challenge when aiming to create seamless user experiences. The demand for responsive and interactive platforms is increasingly crucial, as users expect swift responses to their actions. Building applications on a slow blockchain can lead to delays in transaction confirmations and hinder the overall responsiveness of the user interface.

Recognizing the paramount importance of speed in shaping user experiences, Vanar addresses this challenge head-on. Our blockchain is engineered to deliver exceptional speed, boasting block time that is capped at a maximum of 3 seconds. This impressive turnaround time ensures that transactions are confirmed swiftly, facilitating near-instantaneous interactions and responses to user actions.

Vanar's commitment to high-speed block finality is driven by the understanding that rapid transaction processing is fundamental to fostering a user-friendly environment. By drastically reducing the time it takes for transactions to be finalized, Vanar sets the stage for applications and projects to offer users a level of interactivity and responsiveness that is crucial for delivering an optimal and engaging experience. In essence, Vanar's emphasis on super-fast block time finality is a strategic response to the challenge of sluggish blockchains, ensuring that user experiences on the platform are not only efficient but also seamlessly responsive.

<br>


# Block Size

To achieve higher throughput

Achieving high throughput in a blockchain network is a crucial aspect for ensuring efficient transaction processing. In the context of a blockchain with a 3-second block time and a gas limit of 30 million for a block, the system is optimized for rapid and scalable transaction execution.

In Vanar with a 3-second block time the network can produce blocks at a frequent interval, allowing for a faster confirmation of transactions. This rapid block generation ensures that the blockchain stays responsive to the transaction demands of its users, reducing the overall latency in the system.

The gas limit of 30 million per block provides a substantial capacity for including transactions in each block. Gas is a measure of computational effort required to execute transactions on the blockchain. A higher gas limit allows for more complex and computationally intensive transactions to be processed within each block, enhancing the versatility and functionality of the blockchain.

In combination, the 3-second block time and a gas limit of 30 million create a dynamic environment where a significant volume of transactions can be processed swiftly and efficiently. This high throughput is particularly advantageous for applications requiring quick confirmation times, such as real-time financial transactions, gaming platforms, and decentralized applications with interactive user interfaces. Overall, the combination of a short block time and ample gas limit contributes to a blockchain system optimized for handling a large number of transactions with minimal delay.


# EVM Compatibility

What works on Ethereum, works on Vanar

In line with our 'best fit' over 'best tech' approach Vanar has  chosen to be an Ethereum Virtual Machine (EVM) compatible blockchain.  This aligns with our strategic pursuit of fostering a thriving ecosystem and ensuring rapid adaptability and interoperability within the broader blockchain community. This allows Vanar to benefit from existing EVM compatibility, with numerous protocols already established on EVM-based blockchains.&#x20;

The EVM ecosystem boasts a plethora of tools and a robust developer community well-versed in the intricacies of EVM-based blockchains. This alignment not only facilitates a smooth transition for existing projects but also taps into a wealth of expertise and resources. The abundance of protocols and projects already thriving on EVM chains underscores the significant traction and recognition that EVM compatibility enjoys within the blockchain space.

By embracing EVM compatibility, Vanar strategically positions itself as an attractive option for existing developers and projects looking to migrate seamlessly. Whether opting for a complete transition or expanding their network of supported chains, developers and projects already entrenched in the EVM landscape find Vanar to be a conducive and compatible environment for their endeavors.

In essence, the decision to be EVM compatible serves as an open invitation for the broader blockchain community, providing a familiar and conducive space for collaboration, innovation, and adoption within the Vanar ecosystem. This approach not only accelerates the onboarding process for existing projects but also enriches the overall blockchain landscape by fostering a collaborative and interoperable environment.

<br>


# Consensus Mechanism

Proof of Authority governed by Proof of Reputation

Vanar is poised to employ a hybrid consensus mechanism, primarily relying on Proof of Authority (PoA), complemented by a Proof of Reputation (PoR) mechanism to enhance network security. Initially, the Vanar Foundation will take on the responsibility of running all validator nodes. The Vanar foundation will onboard external participants to join the ecosystem as validators through a PoR mechanism.

The Proof of Reputation system serves as a robust means of onboarding new members into the Vanar ecosystem. Corporates seeking to become validators can participate based on their reputation in Web2 and Web3. This reputation is evaluated by the Vanar Foundation with the objective of ensuring validator nodes are run by known and trusted entities.

By implementing a PoR mechanism Vanar promotes a reliable and sustainable ecosystem. Validators will represent stakeholders with proven reputations, thereby enhancing the overall resilience and trustworthiness of the Vanar blockchain. This thoughtful integration of consensus mechanisms not only reinforces the security of the network but also sets the stage for long-term sustainability and community-driven governance.

The Vanar community will require to stake the VANRY tokens into a staking contract that will give them the right to vote along with other staking benefits

<br>


# Fixed Fees

Vanar Chain's fixed transaction fee model ensures stability and predictability, creating a dependable environment amidst dynamic token prices and network demands. Key advantages include a fair First-In-First-Out transaction processing model, precise cost projection for budgeting, strategic planning for projects, accurate financial management for businesses, and consistent performance during peak times. This model positions Vanar as a sustainable, fair, and predictable blockchain ecosystem, appealing to a diverse range of projects.

Vanar introduces the concept of fixed fees for the transactions in terms of the dollar value of the gas token to ensure that blockchain is always low cost and to help predict the gas costs to run any dApp on top of the Vanar Chain. This is one of the fundamental improvement areas that Vanar is focusing on to build a chain that is cheap and for everyone including small scale projects and massively big enterprise scale projects.


# Gas Fees Tiers

Vanar implements a tiered system to charge different transaction fees based on the transaction size (the gas a transaction consumes). This scheme addresses bad actors, making it expensive to misuse or attack the chain with massively big transactions consuming a lot of space in a block. Transactions like token transfers, token swap, minting an NFT, staking, bridging will still cost the lowest fee tier that Vanar charges, which is a small amount of the VANRY equivalent to $0.0005.&#x20;

### Why different fees for different tiers?

The rationale for implementing different tiers of fixed fees for various transaction sizes is to address potential issues in low-fee blockchains. Without tiered fees a large number of small transactions could overload the system making it unavailable for other users. The network remains very low cost and available for everyone as long as it is used on fair basis which maintains the integrity of the network as a whole.

For instance, if an individual were to send 10,000 large transactions each consuming the entire block space, a blockchain with a 3-second block time would be overwhelmed for 30,000 seconds (or 8 hours and 20 minutes). This would cost the sender only $5 if each transaction were charged $0.0005 and by setting higher fees such as $15 or more for these larger transactions, the cost would rise to $150,000 thereby discouraging misuse and helping to maintain system integrity.\
\
Below are the 5 tiers for fixed fees based on transaction size in terms of gas:<br>

| Gas Range                | Fixed Fees (USD) |
| ------------------------ | ---------------- |
| 21,000 to 12,000,000     | 0.0005           |
| 12,000,001 to 1,500,000  | 1.5              |
| 15,000,001 to 20,000,000 | 3.0              |
| 20,000,001 to 25,000,000 | 7.5              |
| 25,000,001 to 30,000,000 | 15               |

\
\*Note that the gas charged in terms of USD can vary by nominal value (in decimals) due to the changing nature of the market value of the gas token. For example it instead of exact $0.0005 it can be little higher (%0.0005174) or lower (like $0.0004897)


# How it works

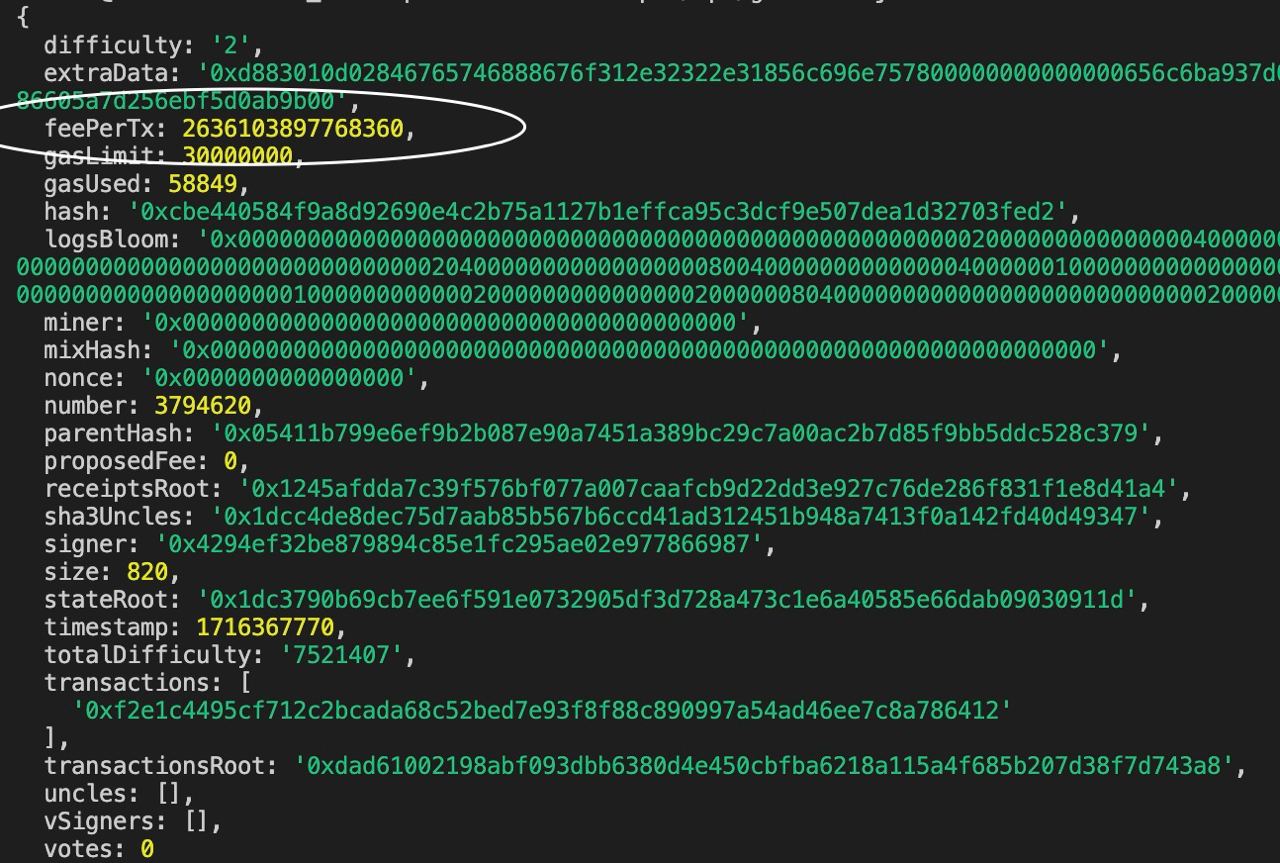
The protocol keeps record of the transaction fees for the tier 1 transactions in block headers with the key 'feePerTx'.&#x20;

In the screenshot below showing details of a block (block number 3,794,620 on testnet) you can see the transaction fees as well that is applicable to the tier 1 transactions (transaction requiring max of 12,000,000 gas). If a transaction falls in any other subsequent tier, then the protocol uses the same transaction fees value and a multiplying factor applicable to the subject tier to know the gas price for the subject transaction. For example for a tier 2 transaction it will be multiplied by 1500 (that is 0.0005 \* 1500 = 0.75$ in terms of USD value)
<figure><img src="https://content.gitbook.com/content/gUode1088gE1VUSxIx5w/blobs/inD662ZdfBnJL6BhKTQt/telegram-cloud-photo-size-4-5940463005215080695-y.jpg" alt=""><figcaption></figcaption></figure>

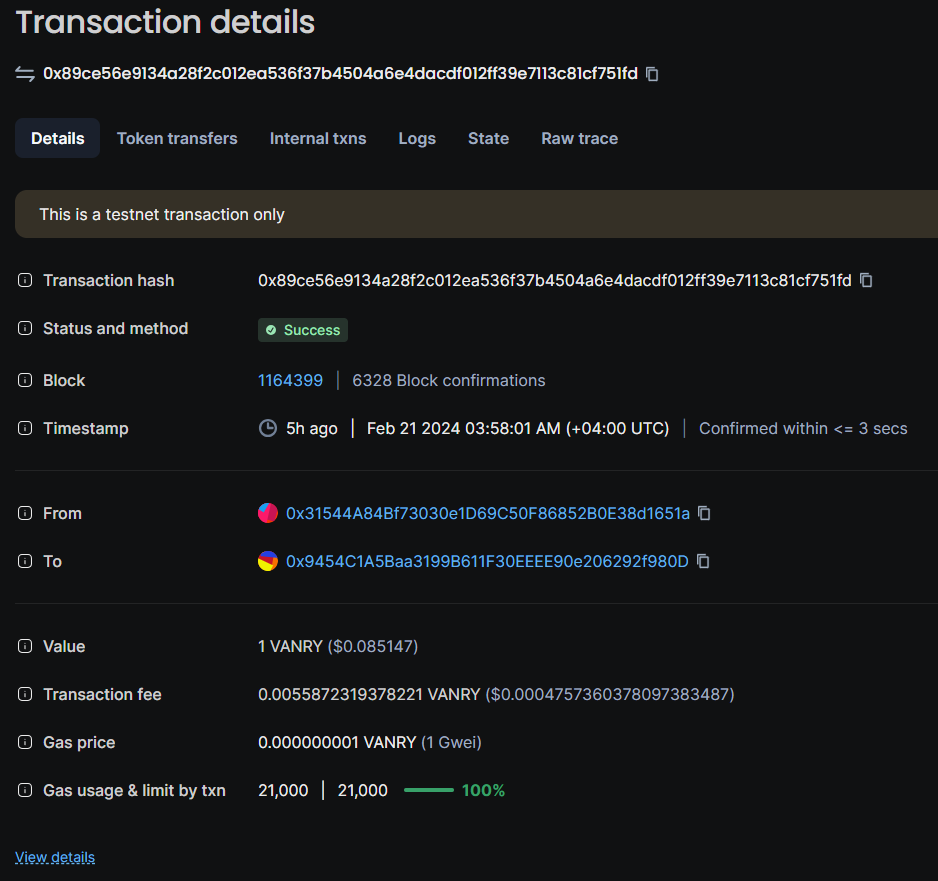
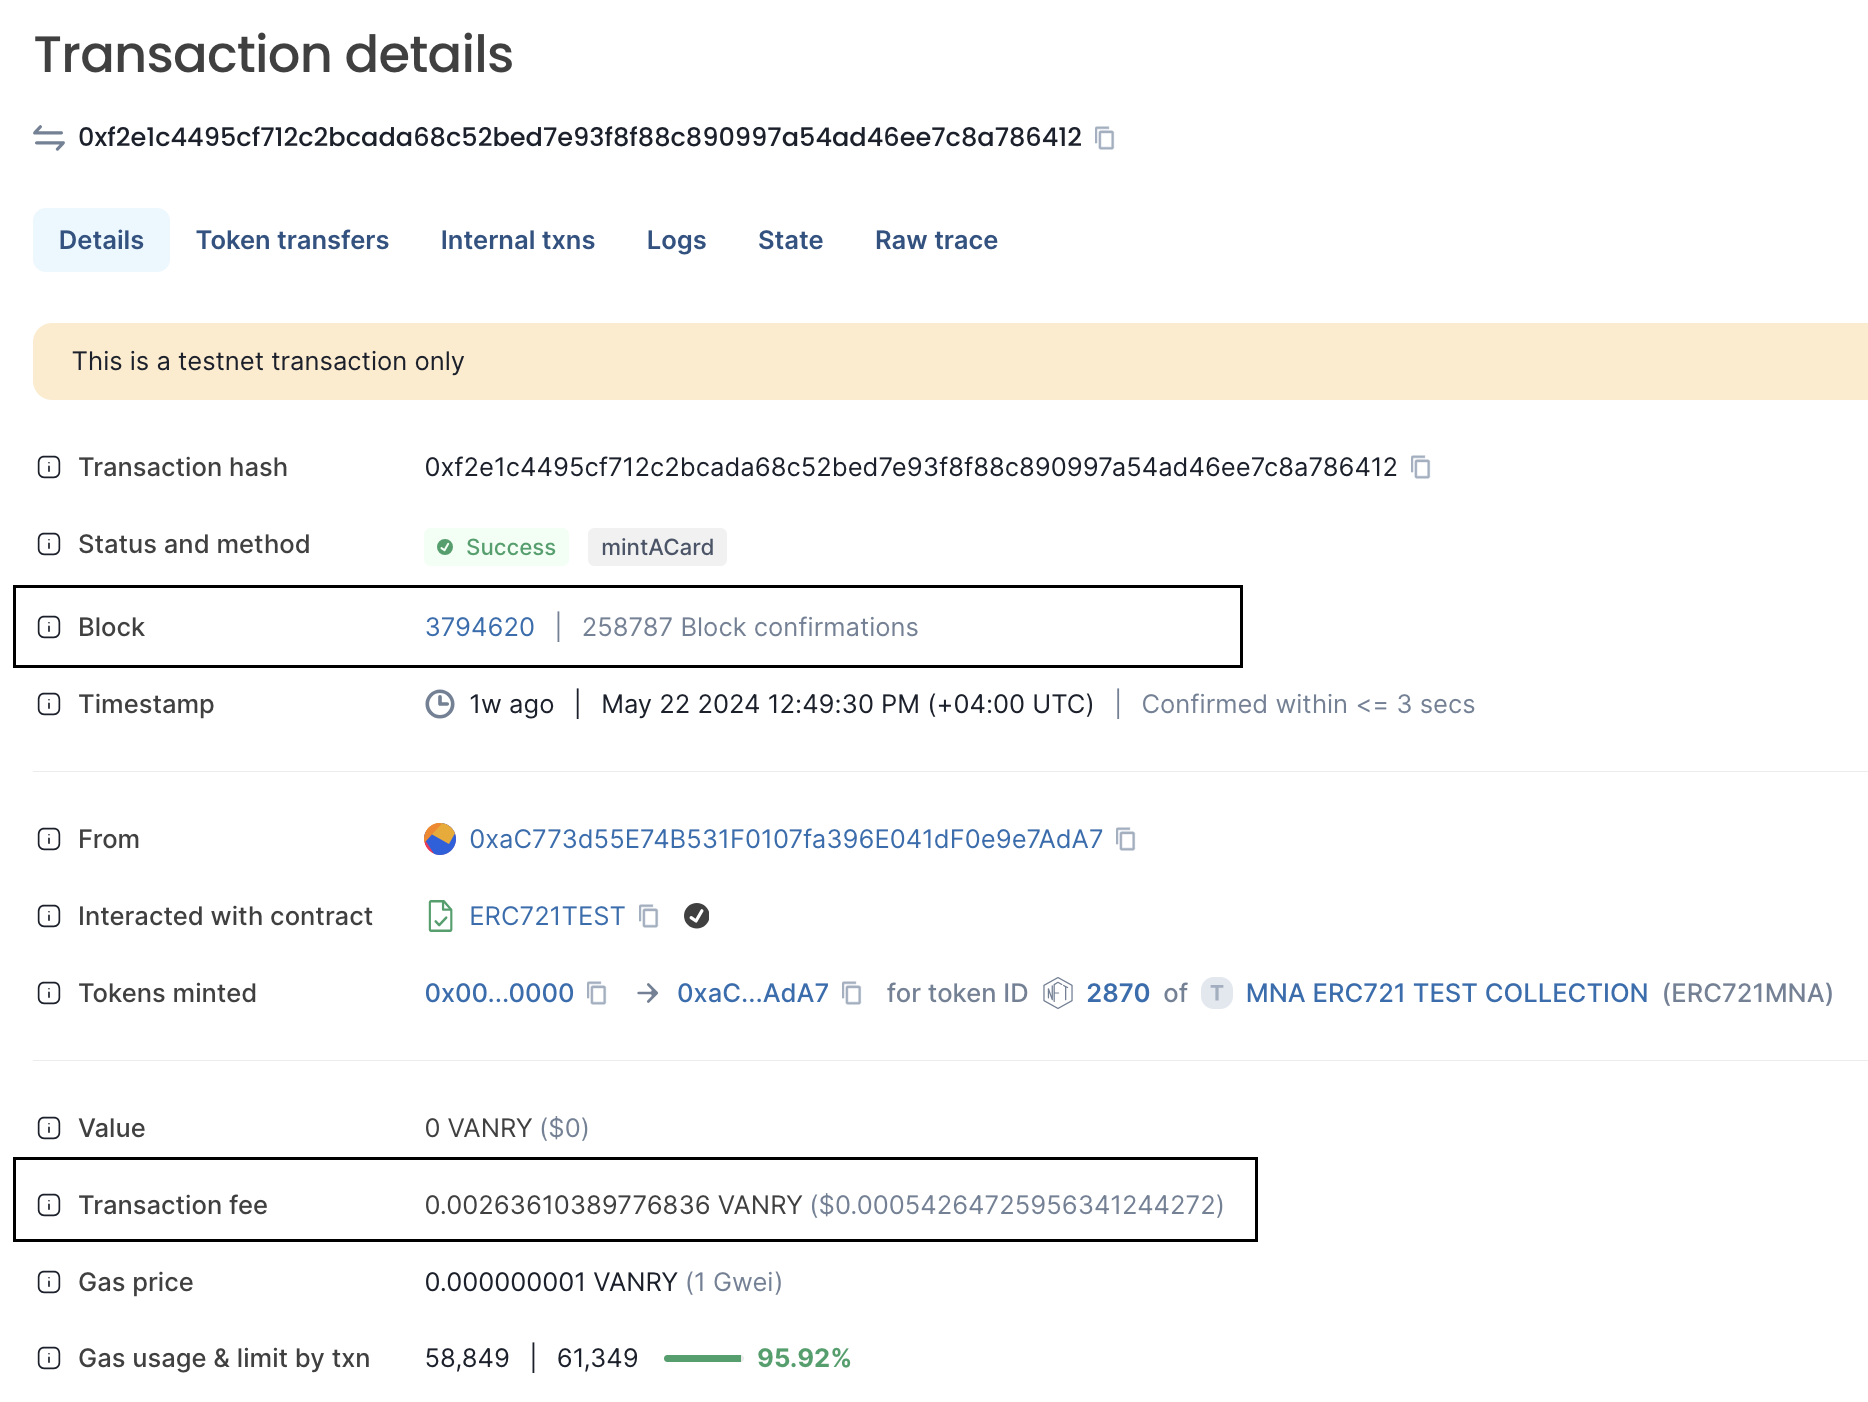
In the screenshot below you can see the exact same fees being charged to a transaction that falls under tier 1. This is is one of the transactions in the same block for which details are shown above.

<figure><img src="https://content.gitbook.com/content/gUode1088gE1VUSxIx5w/blobs/Q8V9mKHS2hC7Y5s6dKHJ/image.png" alt=""><figcaption></figcaption></figure>


# Gas Price API

Vanar has a public API that gives the gas price details in terms of $VANRY token for all the tiers at any given moment. This API allows you to identify the required amount of $VANRY gas token to pay as transaction fees for any given transaction based on the size of the transaction in terms of gas. Below is a copy of the API response for reference.

Here you can see that any transaction with less than 12,000,000 gas will require only small amount of gas token that is equivalent to $0.0005 in terms of USD value. This range covers the vast majority of  transaction types including token transfers, minting NFTs, staking tokens, token swaps and even contract deployments.

```json
{
    "success": true,
    "data": [
        {
            "tier": 1,
            "gas_range_gwei": "0-12000000",
            "tx_fee": 0.002490894602887474,
            "usd_value": 0.0005
        },
        {
            "tier": 2,
            "gas_range_gwei": "12000001-15000000",
            "tx_fee": 7.472683808662421,
            "usd_value": 1.5059
        },
        {
            "tier": 3,
            "gas_range_gwei": "15000001-20000000",
            "tx_fee": 14.945367617324843,
            "usd_value": 3.0119
        },
        {
            "tier": 4,
            "gas_range_gwei": "20000001-25000000",
            "tx_fee": 37.363419043312106,
            "usd_value": 7.5296
        },
        {
            "tier": 5,
            "gas_range_gwei": "25000001-30000000",
            "tx_fee": 74.72683808662421,
            "usd_value": 15.0593
        }
    ]
}
```

#### API Endpoint

You can use the following API endpoint to get the latest gas fees applicable to each tier.

<https://mrawakxvyzsfqtkm.vanarchain.com/vanary-price>


# Fixed Fees Management

A fundamental commitment within the Vanar chain is the determination of transaction charges based on the USD value of the gas token rather than the units of gas required for processing. This commitment is designed to ensure fairness for users, regardless of market fluctuations affecting the native gas token's price. However, a crucial question arises: How can the protocol manage the market-driven price, which inherently lies beyond its direct control?

The solution to this challenge lies in the proactive approach of the Vanar Foundation. The foundation undertakes the responsibility of calculating the VANRY token price by leveraging various on-chain and off-chain data sources. Through a meticulous process of data validation and cleansing, the foundation computes the market price of the VANRY token. This calculated price is then seamlessly integrated into the protocol, establishing a dynamic and adaptive system that adjusts transaction charges based on real-time market conditions.

By incorporating this solution, Vanar ensures that the transaction fees remain consistent, regardless of the market value of the underlying gas token. The tiering system proposed in the protocol leverages the dynamically computed VANRY token price, aligning with the commitment to fair and transparent transaction charging. In essence, this approach safeguards users from the impact of market volatility, providing a stable and predictable environment for transaction processing within the Vanar ecosystem.

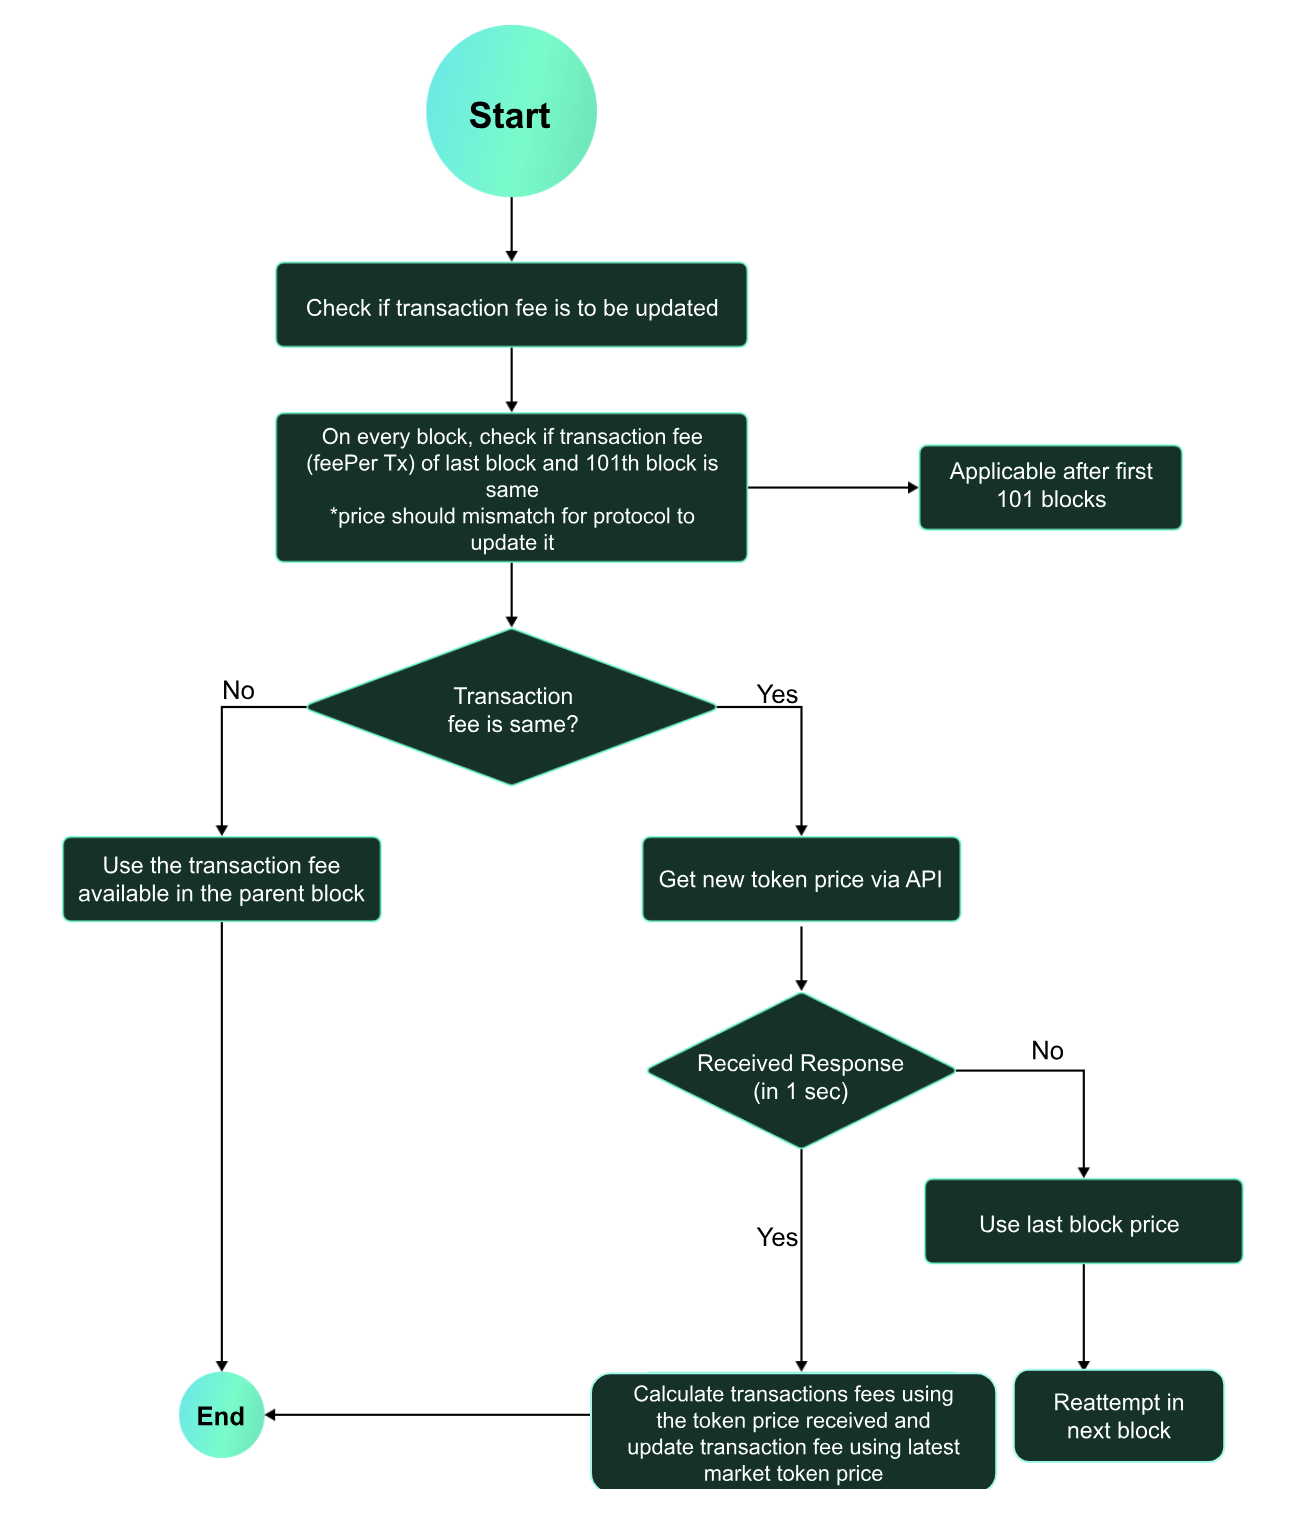
Below is the workflow showing how the transaction fees get updated in the protocol every 5 minutes based on the market value of the native gas token. This is supported by the [VANRY Token Price API](/getting-started/vanar-architecture/fixed-fees/usdvanry-token-price-api) that helps the protocol to know the market value of the native gas token at any given moment.<br>

<figure><img src="https://content.gitbook.com/content/gUode1088gE1VUSxIx5w/blobs/MyZDyH6PYMBnCpyYlDuA/image.png" alt=""><figcaption><p>Check token price every 100th block and update fees based on market price of the gas token</p></figcaption></figure>


# $VANRY Token Price API

To ensure that the end users always get charged a fixed fee of $0.0005 in terms of fiat value for every transaction on Vanar, we have a rigorous system in place where the price is regularly updated at the protocol level using the market price of the VANRY token. The market price is validated via multiple sources including DEXs, CEXs and other data providers ( CoinGecko, CoinMarketCap, Binance) to ensure a reliable price. Outliers from any source that deviates from the others by a large margin is eliminated from the price calculation to avoid any price manipulation.

Below are the steps and components involved to fetch the VANRY price from different sources, aggregating and updating the transaction fee based on the current VANRY price:

* **Price fetcher** - First an independent job constantly updates the VANRY price from different sources using APIs and RPCs at set intervals and logs this information along with the timestamp in a database which is to be used by the price aggregator to compute the latest transaction fees.
* **Price aggregator** - The price aggregator then uses the price feed to calculate the VANRY price based on the latest price fetched from multiple sources. This aggregator only uses the latest price from each source fetched in the last 5 minutes.
  * **Threshold** - The price aggregator calculates the latest transaction fees only when the latest price is available from N number of available sources. For example, if we are fetching the VANRY price from 10 different sources and we have set the threshold value as 5, then the latest price from at least 5 sources must be available in last X minutes at the time of price aggregation.
  * **System alerts** - In the event the latest prices from different sources are not available (minimum threshold criteria not met), the system generates alerts in to notify the team to address the situation.
  * **Price cleansing** - While calculating the transaction fee based on the latest VANRY token price, we ensure that any price from a particular source that deviates from the sources by a large margin  is considered  an outlier and is not considered. This is to make sure that there is no impact due to sudden price movement.
* **Persist new price** - Once the new price is calculated by the price aggregator, this price is updated at the protocol level and the latest blocks always read the transaction fees from this single source of truth that is available all the times at the protocol level.

This latest transaction fees and token price are stored in a highly available system to serve the feed to the protocol whenever it is needed, and is served via an API to the validator nodes.

### **How transaction fees are used**

The latest transaction fees are fetched from the source via the transaction fee API every 100th block. The latest transaction fees is valid for next 100 blocks, after which time it is updated again via the API at protocol level.

If the block difference from the block number when the price was last updated to the current block is more than 100 then it retrieves to the latest price to use and updates it at protocol level.

#### **Fallback mechanism**

In the event that the protocol is not able to read the current transaction fees via the API for any  reason (like service is down for example or request times out within 1 second time) then the new block will read the transaction fees from the parent/last block to make sure the most realistic price is used.


# Neutron

Coming July 2025

**Neutron** is Vanar’s decentralized knowledge ecosystem. It takes scattered information, such as documents, emails, and images, and turns it into a structured network of intelligent data units called **Seeds**.

Each Seed is a compact block of knowledge. It can include text, visuals, files, and metadata. Seeds are stored offchain for performance and flexibility, and optionally onchain for verification, ownership, and long-term integrity. This hybrid approach gives users both speed and trust.

***

#### What Are Seeds?

Seeds are the core building blocks of Neutron. A single Seed can represent:

* A document, email, or image
* A paragraph of structured content
* A visual reference or caption
* Linked information that connects across other Seeds
* An optional onchain record that verifies authorship and timestamp

Each Seed is enriched with AI embeddings, which makes it context-aware and highly searchable. You can search based on meaning, time, file type, or even visual similarity.

***

#### How Do You Use Neutron?

Most users interact with Neutron through **Kayon AI**, a personal business intelligence assistant that connects to platforms like Gmail and Google Drive. It helps you turn raw data into meaningful insights using natural language.

> You can learn more about how Kayon works in the [Kayon AI section](/ai-tech/kayon-ai).

***

#### Onchain Storage

Neutron is designed with privacy and user choice at the center. By default, Seeds are stored offchain for fast access. For users who want additional security or auditability, there is an optional onchain storage layer powered by Vanar Chain.

This adds features like:

* Immutable metadata and ownership tracking
* Encrypted file hashes for integrity verification
* Transparent audit trails

Only the document owner has the decryption key, ensuring that even onchain data remains fully private. This makes Neutron a strong fit for enterprise needs where compliance and verifiability are essential.


# Core Concepts

Neutron is built on a flexible, modular knowledge architecture designed to make information accessible, verifiable, and intelligent. At the heart of this system is the **Seed**, a compact unit of knowledge enhanced by AI.

***

#### Seeds: The Building Blocks of Knowledge

A **Seed** is a self-contained object that captures and organizes information. It can include:

* Text in more than 50 languages
* Images and visual references
* PDFs and structured documents
* Cross-references to other Seeds
* AI-generated embeddings for deep understanding
* Optional blockchain-based verification and ownership

Seeds are modular, searchable, and interconnected. They let users explore relationships between ideas, trace the origin of documents, and surface the right information quickly.

***

#### AI-Enhanced Intelligence

Every Seed is automatically enriched using advanced AI models. This includes:

* Semantic embeddings that support meaning-based search
* Cross-modal indexing to connect text with images
* Context graphs that reveal hidden relationships
* Smart metadata for better organization and filtering

Neutron doesn’t just store data. It understands what the data means, how it’s connected, and why it matters.

***

#### Dual Storage Architecture

Neutron is designed with flexibility in mind. It supports two storage models, giving users control over how their information is handled.

**Offchain by Default**

* Supports rich media and full documents
* Enables lightning-fast search and indexing
* Optimized for performance and low cost

**Onchain**

* Stores metadata and references immutably
* Provides cryptographic verification and audit logs
* Tracks ownership with decentralized access control
* Runs on Vanar Chain, with ultra-low gas fees

This setup allows users to keep things fast and efficient by default, while activating onchain features only when verification or provenance is needed.

***

#### Document Storage Smart Contract

When a Seed is stored onchain, Neutron uses a specialized smart contract that includes:

* Encrypted file hashes for content verification
* Encrypted pointers to UltraPDF compressed files
* Embeddings stored securely onchain (up to 65KB per document)
* Owner addresses and permission settings
* Timestamps and document history

Only the document owner can decrypt what’s stored. Neutron never holds or exposes raw data.

***

#### Privacy First

Neutron is built from the ground up to protect privacy. Its system enforces:

* Client-side encryption before anything is sent or stored
* Onchain data that remains fully encrypted and private
* Metadata that never reveals personal or business information

Your data stays yours. No one else can access, verify, or share it unless you allow it.


# Business Intelligence

Neutron isn’t just a knowledge store. It’s an intelligence engine built to help individuals and teams extract meaning, uncover patterns, and make better decisions using their own data. With built-in AI and optional blockchain verification, Neutron turns information into insight.

***

#### Cross-Platform Analytics

Neutron brings together your entire digital ecosystem. By connecting tools like Gmail, Google Drive, Slack, and CRMs, it can answer complex questions that span across platforms.

Examples include:

* **What are the recurring themes in our customer feedback?**
* **Which sales prospects mentioned pricing objections in emails and meetings?**
* **What decisions were made about remote work in Q3?**
* **Where are the blockers across Asana, Slack, and GitHub?**

Neutron helps you see the full picture by linking people, timelines, documents, and decisions.

***

#### Intelligent Insights

The AI behind Neutron surfaces connections that are easy to miss. It helps you identify:

* **Communication networks** — who is collaborating and how often
* **Project timelines** — how initiatives develop and who contributes
* **Decision points** — when key choices were made and what triggered them
* **Knowledge gaps** — where critical information might be missing

It doesn’t just find data. It helps you understand why things happened.

***

#### Context-Aware Memory

Neutron remembers what you've asked, understands the conversation, and builds on it.

**Example:**

> **You:** “Show me the Q3 budget discussion.”\
> **Neutron:** \[Finds emails, spreadsheets, and meeting notes]\
> **You:** “Who pushed back on the marketing increase?”\
> **Neutron:** \[Surfaces names, comments, and context]

It works like a colleague who knows your data inside out and never forgets.

***

#### Source Citations

Every AI-generated answer includes links to the original content. That might be:

* Emails
* Documents
* Meeting notes
* Seeds used in the response

This level of traceability builds trust. You always know where the insight came from and can verify it instantly.

***

#### Semantic Business Search

Forget keyword matching. Neutron uses meaning-based search to understand what you're really looking for.

You can:

* Search **“budget concerns”** and find relevant expense discussions
* Look for **“client feedback”** across emails, CRMs, and surveys
* Find **“project delays”** in task managers, email threads, and Slack updates

It works across formats and languages, including PDFs, emails, and Markdown files.

***

#### Cross-Source Querying

Neutron doesn’t silo your tools. It lets you ask a single question and pull information from everywhere at once.

Try prompts like:

* **“Find everything related to the Johnson account.”**
* **“What was discussed about the API launch in GitHub, Slack, and Drive?”**
* **“Show decisions made about hybrid work across emails, meetings, and documents.”**

No need to jump between tools or tabs. Neutron connects it all.

***

#### Time-Based Intelligence

Neutron understands how things evolve over time. This helps you track change, spot trends, and understand momentum.

You can ask:

* **“What changed about pricing strategy last month?”**
* **“How has the client relationship developed over the last two quarters?”**
* **“Which projects are running behind based on recent updates?”**

It’s built for people who want not just answers, but clarity over time.


# Integrations

#### Currently Available

You can already connect the following platforms:

**Gmail**

* Indexes emails, threads, contacts, and attachments
* Analyzes communication patterns, topics, and sentiment

**Google Drive**

* Scans PDFs, Word documents, spreadsheets, and presentations
* Maintains original file permissions and sharing settings
* Converts content into Seeds with full-text indexing and AI embeddings

***

#### Coming Soon

Neutron’s integration roadmap is built for teams, developers, and enterprises. Here’s what’s next:

**Team Communication**

* Slack
* Microsoft Teams
* Discord

**Project Management**

* Asana
* Linear
* Jira
* Monday.com

**Documentation**

* Notion
* Confluence
* SharePoint
* Obsidian

**CRM and Sales**

* HubSpot
* Salesforce
* Pipedrive

**Cloud Storage**

* Dropbox
* OneDrive
* Box

**Development and Engineering**

* GitHub
* GitLab
* Bitbucket

**Scheduling**

* Google Calendar
* Outlook
* Calendly

**Finance and Operations**

* QuickBooks
* Stripe
* Banking APIs

**Marketing and Social**

* Twitter
* LinkedIn
* Facebook Analytics

***

#### How It Works

**Step 1: Secure Connection**

* Connect accounts using OAuth or API authentication
* All access is based on user-granted permissions
* Tokens are encrypted and stored securely

**Step 2: Smart Indexing**

* AI extracts relevant content, metadata, and relationships
* Seeds are generated and automatically organized
* No changes are made to your existing files or structures

**Step 3: Continuous Sync**

* New emails, files, and updates are indexed in real time
* Deleted or revoked content is removed promptly
* Your search results always reflect the latest version of your data

***

#### Why Use Neutron

Neutron brings everything together, removing the need to check multiple platforms just to find one answer.

You don’t need to remember where something is stored. You simply ask, and Neutron searches across your entire connected ecosystem.

**Example:**

> "What was discussed about pricing?"\
> Neutron will look across Gmail, Drive, Slack, and Notion in a single query.

This goes beyond search. It gives you true context and understanding across all your tools.


# Privacy & Ownership

Neutron is built around one core principle: **your knowledge, your rules**.

Whether you're an individual, a startup, or an enterprise, Neutron ensures that your data remains private, secure, and fully under your control. Blockchain-based verification is available when needed but never required.

***

#### End-to-End Privacy by Design

Neutron prioritizes security from the ground up:

* **Client-Side Encryption**\
  All sensitive data is encrypted on your device before it is ever transmitted or stored.
* **No Plaintext Storage**\
  Neutron never stores or reads unencrypted content, whether offchain or onchain.
* **Selective Indexing**\
  You decide which files, messages, and folders are included in your knowledge base.
* **Hash-Based Verification System**\
  Content can be verified cryptographically using secure cryptographic hashes.

Even when documents are stored onchain, only the owner holds the decryption keys. The content remains entirely private.

***

#### Blockchain Ownership

When you choose to store Seeds or documents onchain, Neutron uses blockchain-backed infrastructure to provide:

* Cryptographic proof of ownership
* Tamper-resistant hashes and timestamps
* Full audit trails without exposing content
* Verifiable integrity of every registered document

> Onchain storage runs on **Vanar Chain**.

What you can store:

* Encrypted document references and metadata
* AI embeddings (up to 65KB per document)
* Ownership permissions
* Registration history and access logs

***

#### Transparency Without Exposure

Neutron delivers verifiability without compromising privacy:

* **Explainable AI Responses**\
  You can always see which documents contributed to an answer.
* **Source Citations**\
  Jump directly to the original Seed or file when needed.
* **Immutable Context**\
  Blockchain records confirm content integrity after submission.

Even when AI uses your documents to generate insights, no one else can access the source content unless you authorize it.

***

#### Decentralized Safeguards

Optional onchain features provide additional resilience and accessibility:

* **No single point of failure**\
  Your data is validated and stored across a distributed system.
* **Censorship resistance**\
  No centralized authority can block, change, or hide your knowledge.
* **Global access**\
  Retrieve your encrypted documents from anywhere in the world.
* **Future-proof storage**\
  Blockchain records persist over time with full cryptographic history.

***

#### Enterprise-Grade Controls

Neutron offers powerful tools for organizations that need strict access policies:

* **Role-based permissions**\
  Assign access rights based on team roles or departments.
* **Multi-signature approvals**\
  Require multiple confirmations for sensitive actions.
* **Usage tracking**\
  Log activity like searches, access, and document exports.
* **Recovery and portability**\
  Export or back up encrypted data at any time with full control.


# Advanced Usage

Once your data sources are connected and insights start flowing, Neutron unlocks a wide range of advanced features. These tools help you dive deeper, work smarter, and collaborate more effectively.This section highlights key strategies to get the most out of your knowledge ecosystem.

***

**Semantic Deep Search**

Neutron doesn’t rely on exact keywords. It understands what you're really asking.Use natural language to find relevant insights across all your content:

* **"Show me all documents related to pricing negotiations this year"**
* **"What are the main reasons for project delays mentioned in any system?"**
* **"Find all sales objections from West Coast prospects since April"**
* **"Which engineers discussed the new deployment system on Slack or GitHub?"**

Even if the words aren't identical, Neutron understands the meaning and returns what matters.

***

**AI-Driven Pattern Discovery**

Neutron can analyze data, not just search through it.Try asking it to:

* **Detect trends** *"How has client sentiment changed over Q2?"*
* **Surface key insights** *"Which marketing strategies were linked to revenue spikes?"*
* **Spot anomalies** *"Which projects had unusual delays?"*
* **Expose blind spots** *"What information are we missing in our product planning?"*

Neutron becomes a proactive intelligence layer that helps you see what others miss.

***

**Custom Categorization**

Organize your knowledge in a way that fits your workflow:

* **Smart Tags** Applied automatically based on topics, people, or source
* **Manual Labels** Create your own system for priorities, departments, or ownership
* **Cross-Linking** Connect related Seeds across projects or themes
* **Context Graphs** Visualize how documents and ideas are connected over time

With the right structure, even massive knowledge bases stay clear and manageable.

***

**Scheduled Reports and Alerts**

Keep your team informed without lifting a finger:

* **Weekly briefings** delivered by email
* **Custom alerts** for newly matched documents
* **Digest emails** with summaries of key updates and risks
* **Role-based reports** tailored to specific teams or stakeholders

**Example:** *"Send me a report every Friday with all updates related to the Q3 launch from Slack, Jira, and Drive."*

***

**Team Collaboration**

Neutron makes knowledge a shared resource:

* **Shared searches** Let others access your saved queries
* **Insight threads** Comment and discuss findings directly inside Neutron
* **Access controls** Decide who can view, edit, or share Seeds
* **Version tracking** See who added or changed content, and when

Instead of siloed knowledge, your organization gains a connected intelligence layer.

***

**Contributing to the Knowledge Network**

With your consent, you can expand the value of your insights beyond your organization:

* Contribute anonymized Seeds to Neutron’s global knowledge graph
* Share insights with your team or broader community
* Collaborate with verified partners using cryptographic trust
* Participate in shared clusters based on industries or expertise

This transforms Neutron from a company tool into a decentralized knowledge hub.

***

**Best Practices for Power Users**

* **Be specific** The more detail in your query, the better the results
* **Think across platforms** Don’t just search Drive—include email, chats, and tasks
* **Name and save** Label searches like "Team Feedback This Quarter" for reuse
* **Set regular reviews** Run weekly check-ins to stay ahead of change
* **Use blockchain wisely** Store high-value or sensitive knowledge onchain when verification matters

***

Neutron is more than just a search tool. It helps you see clearly, plan ahead, and work together at every level of your organization.[<br>](https://app.gitbook.com/o/xK69R0XTzGnvdqQ5hNhu/s/GGKiTazxt8pHaSCSak9N/ai-tech/neutron/privacy-and-ownership)


# Kayon AI

Coming July 2025

### Getting Started with Kayon AI

**Kayon AI** is your intelligent gateway to Neutron. It connects to platforms like Gmail and Google Drive to turn scattered business data into a private, encrypted, and searchable knowledge base powered by AI.

This guide walks you through setup, integration, and your first steps.

***

#### Step 1: Choose How You Want to Sign In

You can access Kayon AI using any of the following methods:

**Google Account**

* Quick and secure OAuth login
* Ideal for connecting Gmail or Drive

**Traditional Account**

* Sign up with your email and password

**Web3 Wallet**

* Connect using MetaMask, WalletConnect, or another supported wallet
* Best if you want to link onchain document ownership and permissions

All methods come with full encryption, strong privacy standards, and secure access.

***

#### Step 2: Connect Your Data Sources

Start by linking the platforms you already use. Once connected, Kayon begins processing and indexing your data into Neutron Seeds.

**Gmail Integration**

* Uses secure OAuth authentication
* Indexes emails, subjects, attachments, and contacts
* Understands topics, conversation threads, and communication patterns
* Automatically categorizes emails by function (sales, support, finance, etc.)

**Google Drive Integration**

* Supports PDFs, Word documents, spreadsheets, and presentations
* Converts files into searchable Seeds with AI context
* Keeps original file permissions and folder structure intact

***

#### Coming Soon: Expanded Integrations

Kayon is expanding its integration suite to cover the full range of tools used in modern businesses.

**Planned integrations include:**

* **Team Communication**: Slack, Microsoft Teams, Discord
* **Documentation**: Notion, Confluence, SharePoint
* **Project Management**: Asana, Linear, Jira, Monday.com
* **CRM and Sales**: HubSpot, Salesforce, Pipedrive
* **Cloud Storage**: Dropbox, OneDrive, Box
* **Development Tools**: GitHub, GitLab, Bitbucket
* **Scheduling**: Google Calendar, Outlook, Calendly
* **Finance**: Stripe, QuickBooks, banking APIs
* **Marketing and Social**: Twitter, LinkedIn, Facebook Analytics

These integrations will allow Kayon to become your full cross-platform business memory.

***

#### Step 3: Start Querying Your Data

Once your accounts are connected, you can begin asking questions using plain language. Kayon will search across all sources and provide clear, source-cited answers.

**Example queries:**

* **"What did we discuss with the Johnson account last quarter?"**
* **"Find all documents about the Q3 roadmap."**
* **"Who raised concerns about pricing in meetings or emails?"**

Everything is contextual, traceable, and easy to explore.

***

#### Data Control and Privacy

With Kayon, you're always in control:

* Choose exactly which platforms and data to connect
* All content is encrypted before being processed
* Nothing is shared unless you choose to share it
* You can remove any integration or dataset at any time

Kayon follows Neutron’s privacy-first architecture. Your data stays yours.


# Querying Your Data

### Querying Your Data

Kayon AI turns your connected accounts into a living, searchable knowledge graph. There’s no need to dig through folders, scroll through inboxes, or hunt through chat logs. Just ask a question, and Kayon finds what matters.

This guide shows how to use natural language to surface documents, uncover insights, and understand patterns in your business data.

***

#### Ask Anything

Kayon understands full sentences and business context. You can ask about:

* **People**\
  *“What has Jane Doe worked on this month?”*
* **Topics**\
  *“Show me all discussions about pricing strategy.”*
* **Timelines**\
  *“What changed about the Q3 budget since July?”*
* **Decisions**\
  *“When did we agree to shift the product launch?”*
* **Problems**\
  *“What’s blocking the West Coast sales pipeline?”*

***

#### Contextual Memory

Kayon remembers your previous questions and continues the conversation naturally.

**Example:**

> **You:** “Show me the latest product feedback.”\
> **Kayon:** \[Finds reviews, tickets, and notes]\
> **You:** “Any recurring complaints?”\
> **Kayon:** \[Highlights trends and repeated issues]\
> **You:** “Who is following up on these?”\
> **Kayon:** \[Shows responsible teammates and tasks]

It works like a teammate who knows the entire history and never forgets.

***

#### Smart Summarization and Analysis

Kayon goes beyond retrieval. It gives you clear, concise answers.

* *“Summarize all investor feedback from Q2.”*
* *“What’s the tone of our customer support in August?”*
* *“Summarize Slack conversations about the product redesign.”*

Each summary comes with links to source documents, so you can double-check or go deeper instantly.

***

#### Source-Level Transparency

Every AI response includes:

* The exact documents used
* Dates and timestamps
* Linked previews for quick context
* Names of involved team members (if relevant)

You always know where the answer came from, with nothing hidden or fabricated.

***

#### Cross-Source Intelligence

Kayon searches across all connected platforms at once.

**Examples:**

* *“Find every touchpoint with the Acme account.”*

  > Kayon pulls emails, CRM entries, chat logs, and meeting notes.
* *“What did the team say about remote work in Slack and Google Docs?”*
* *“Show all bug reports that match our GitHub issues and support tickets.”*

You don’t need to repeat searches in multiple tools. Kayon brings it all together.

***

#### Saved Queries and Reports

Make your best prompts reusable and actionable.

* Save your most useful questions
* Schedule reports to run weekly or monthly
* Create dashboards tailored to team roles
* Export responses and document trails when needed

**Example:**\
Save *“Weekly Sales Objections”* as a query and get a report delivered every Monday.

***

#### Best Practices

* **Be specific**\
  Include names, dates, or platforms for better results
* **Ask for meaning**\
  Use questions like “why,” “what changed,” or “when” to get deeper insights
* **Follow up naturally**\
  Continue from your last question instead of starting over
* **Use citations**\
  Every answer links to the original source
* **Combine sources**\
  Ask questions that span across Drive, Gmail, CRM, and more to unlock full value

***

Kayon is more than a search bar. It is your second brain for work—built to understand context, track knowledge, and help you move faster with confidence.


# Use Cases

Kayon AI adapts to your role, your workflow, and your priorities. Whether you're leading a team, closing deals, building products, or supporting customers, Kayon helps you turn disconnected data into actionable intelligence.

There’s no need to switch tools or dig for information. Kayon works in the background, surfacing what matters most.

***

#### For Executives and Managers

Make faster, better-informed decisions across the entire organization.

* **Strategic Insights**\
  *“What are the recurring themes in our client feedback?”*
* **Team Analytics**\
  *“Who are our most productive cross-functional collaborators?”*
* **Decision Tracking**\
  *“What factors influenced our pricing changes this year?”*
* **Market Intelligence**\
  *“What trends are our competitors discussing?”*

***

#### For Sales and Business Development

Understand every touchpoint, objection, and opportunity in your pipeline.

* **Client Relationship Management**\
  *“Show me all interactions with our top 10 clients.”*
* **Pipeline Analysis**\
  *“What common objections do prospects raise?”*
* **Performance Insights**\
  *“Which proposals led to successful closes?”*
* **Territory Intelligence**\
  *“What opportunities exist in the West Coast market?”*

***

#### For Product and Engineering Teams

Keep product development aligned with user needs and internal knowledge.

* **Development Insights**\
  *“What are the most common bugs across GitHub and support channels?”*
* **Feature Planning**\
  *“How do user requests align with our technical roadmap?”*
* **Code Review Patterns**\
  *“What coding standards come up most often?”*
* **Release Impact**\
  *“How did users respond to the latest feature rollout?”*

***

#### For Customer Success and Support

Deliver proactive, informed, and context-aware service experiences.

* **Omnichannel Support**\
  *“What’s the full history for this client across email, CRM, and chat?”*
* **Issue Resolution**\
  *“What solutions worked for similar problems in the past?”*
* **Customer Health**\
  *“Which accounts show early warning signs of churn?”*
* **Knowledge Base Automation**\
  *“What questions come up most often, and how are we answering them?”*

***

#### For Enterprises Using Onchain Storage

In compliance-driven or regulated industries, Kayon and Neutron provide an added layer of transparency and trust.

* **Regulatory Readiness**\
  Immutable audit trails for key decisions and documents
* **Data Ownership**\
  Proof of authorship, access logs, and version history
* **Cross-Team Trust**\
  Share verifiable, encrypted insights across departments or with partners
* **Security Audits**\
  Review the full history of content creation, edits, and access through blockchain verification

***

Kayon turns scattered information into structured, meaningful insight. It helps every team move faster, stay aligned, and make smarter decisions with confidence.


# For Developers

The tools you need to build on Vanar mainnet or Vanguard testnet.

Before you start building on Vanar mainnet or Vanguard testnet, ensure you have the following prerequisites in place. If you are new to EVM development then we highly recommend you to first learn the basics of EVM and how it works. You can refer to [Ethereum](https://ethereum.org/en/developers) to learn everything related to EVM and how it works along with the development tools required to build on an EVM blockchain.&#x20;

1. Understanding of how EVM chains work i.e. Vanar, Ethereum and Optimisim.&#x20;
2. Development environment set up, list of available frameworks [here](https://ethereum.org/en/developers/docs/frameworks/).
3. Network access to Vanguard testnet or Vanar Chain mainnet RPC details. You can see Vanar mainnet and testnet network details [here](/builders/for-developers/vanar-network-details).


# Vanar Network Details

Core details to enable developing on the Vanar

You need the following network details to interact with the Vanar chain. Below you can find all the required details for interacting with Vanar mainnet and the testnet (Vanguard).

### Vanar Mainnet

Below are the details for the Vanar mainnet.

| Parameter       | Value                                                               |
| --------------- | ------------------------------------------------------------------- |
| Network Name    | Vanar Mainnet                                                       |
| RPC Endpoint    | [https://rpc.vanarchain.com](<https://rpc.vanarchain.com	>)         |
| Web Socket:     | wss\://ws.vanarchain.com                                            |
| Chain ID        | 2040                                                                |
| Currency Symbol | VANRY                                                               |
| Block Explorer  | [https://explorer.vanarchain.com](https://explorer.vanarchain.com/) |

### Vanguard

Below are the details for the Vanar testnet.

| Name                | Value                                                                                 |
| ------------------- | ------------------------------------------------------------------------------------- |
| Network Name        | Vanguard Testnet                                                                      |
| RPC Endpoint        | [https://rpc-vanguard.vanarchain.com](https://rpc-vanguard.vanarchain.com/)           |
| Web Socket:         | wss\://ws-vanguard.vanarchain.com                                                     |
| Archive Web Socket: | wss\://wsa-vanguard.vanarchain.com                                                    |
| Chain ID            | 78600                                                                                 |
| Currency Symbol     | VG                                                                                    |
| Block Explorer      | [https://explorer-vanguard.vanarchain.com](https://explorer-vanguard.vanarchain.com/) |
| Faucet              | [https://faucet.vanarchain.com](https://faucet.vanarchain.com/)                       |


# Adding Network to Wallet

You can interact with the Vanar blockchain via its publicly available RPCs for testnet (Vanguard) and mainnet. To use Vanar using your wallet first you need to add Vanar as a network into your preferred EVM compatible wallet such as MetaMask. Follow the steps below to add the network to the MetaMask browser extension (applicable to both testnet and mainnet):

* Open the MetaMask browser extension like in Chrome web browser.
* Open the network selection dropdown menu by clicking the dropdown button at the top of the extension.
* Click the **Add network** button.
* Click **Add a network manually** at the bottom.
* In the **Add a network manually** dialog that appears, enter the following information for the respective network (Mainnet or testnet):

<table><thead><tr><th width="233.33333333333331">Name</th><th width="274">Mainnet</th><th width="304.6666666666667">Testnet</th></tr></thead><tbody><tr><td>Network Name</td><td>Vanar Mainnet</td><td>Vanguard Testnet</td></tr><tr><td>RPC Endpoint</td><td><a href="https://rpc.vanarchain.com	">https://rpc.vanarchain.com</a></td><td><a href="https://rpc-vanguard.vanarchain.com/">https://rpc-vanguard.vanarchain.com</a></td></tr><tr><td>Chain ID</td><td>2040</td><td>78600</td></tr><tr><td>Currency Symbol</td><td>VANRY</td><td>VG</td></tr><tr><td>Block Explorer</td><td><a href="https://explorer.vanarchain.com/">https://explorer.vanarchain.com</a></td><td><a href="https://explorer-vanguard.vanarchain.com/">https://explorer-vanguard.vanarchain.com</a></td></tr></tbody></table>

* Tap the Save button to save the network details.

Now you should be able to connect to Vanar by selecting it from the network selection dropdown menu.

### Alternate ways to add Vanar networks to Metamask (using desktop)

You can add Vanar mainnet and testnet to Metamask using following two options:

#### Add network using Chainlist.org

Go to the chain details and simply add the network using "Add to Metamask" CTA as shown below.

For mainnet: <https://chainlist.org/chain/2040>

For testnet: <https://chainlist.org/chain/78600>

<figure><img src="https://content.gitbook.com/content/gUode1088gE1VUSxIx5w/blobs/eBCPJyClOgFmOkzFqOSC/image.png" alt=""><figcaption></figcaption></figure>

#### Add Network using Explorer

You can go to the the explorer and add the network using the "Add network" button available at the bottom left of the explorer page for both mainnet and testnet.

Mainnet: <https://explorer.vanarchain.com/>

Testnet: <https://explorer-vanguard.vanarchain.com/>


# Connect Wallet to Vanar Chain

Blockchain wallets enable you to have an account on Vanar chain. They allow you to manage your own assets and perform blockchain actions via the use of keys which only you have access to.

***

### Supported Wallets

Currently, any EVM-based wallet that allows you to configure Vanar chain as a custom RPC network.

Compatible wallets:

* Metamask
* Coinbase
* Brave
* Walletconnect

### Account Abstracted Wallets

Projects may choose to employ `ERC-4337`account abstraction EIP. This allows projects to deploy a wallet on the users behalf, abstracting away private keys and pass phrases from the users. This allows access to wallets using traditional authentication like social sign-on or username/email and password, removing friction associated with Web3 dApps. The follow projects are supporting Vanar chain to provide such services for users and projects to make web 3 on-boarding as simple as possible:

* [Thirdweb](/builders/for-developers/build-with-thirdweb)
* [Brillion](https://brillion.finance/)

More partners are coming soon.


# Gas Estimation

Vanar has a different gas fees structure to charge gas fees for transactions based on their transaction size. It is important for  developers and end users (such as dApp users with Metamask wallet) to pass the right amount of gas when sending the transactions to the Vanar network.

The Vanar protocol by default estimates gas for the first tier (gas limit up to 12,000,000 gas) if no gas limit is provided when doing the gas estimation for a transaction. If a transaction is going to consume more than 12,000,000 gas then the gas estimation will fail if no gas limit is provided, as the default limit is set to 12,000,000.

You always get a working gas estimate if you pass the full block limit as gas limit (that is 30,000,000) when estimating the gas for a transaction. You can safely pass this estimated gas when sending the transaction to the network. Below are different scenarios of how this works:

Below is the sample code for gas estimation with [web3.js](https://web3js.readthedocs.io/) library.

### Estimate without gas limit

Below is sample code where gas is estimated without passing the gas limit.

```javascript
const estimatedGas = await myContract.methods.methodToCall(parameters).estimateGas();
                                
console.log('Estimated gas is:', estimatedGas);
```

#### Possible results:

1. It will estimate the gas correctly if the maximum gas required for the transaction will be less than 12,000,000 gas which is the max limit for tier 1 in Vanar protocol.
2. It will return an error showing the gas required is exceeded the limit like:

   `Error sending transactions: Error: Returned error: gas required exceeds allowance (12000000)`

### Estimate with gas limit

Below is sample code where gas is estimated by passing the gas limit for estimation.

```javascript
const estimatedGas = await myContract.methods.methodToCall(parameters)
                                .estimateGas({gas: 30000000});
                                
console.log('Estimated gas is:', estimatedGas);
```

#### Possible results:

1. It will estimate the gas correctly if the maximum gas required for the transaction will be less than the maximum block size which is 30,000,000 gas in Vanar protocol.
2. It will throw an error showing the gas required is exceeded the limit like:

   `Error sending transactions: Error: Returned error: gas required exceeds allowance (30000000)`

Refer to the official [web3.js docs](https://web3js.readthedocs.io/en/v1.10.0/web3-eth-contract.html?highlight=estimateGas#methods-mymethod-estimategas) to learn more about gas estimation in general.


# Build with thirdweb

Welcome to the integration guide for leveraging thirdweb's web3 toolings to seamlessly build and deploy on Vanar Chain. This overview is designed to provide developers with a foundational understanding of how thirdweb's robust toolkit can be used to create, deploy, and manage dApps and smart contracts with unprecedented ease and efficiency.

**thirdweb: Empowering Web3 Development**

thirdweb offers a complete suite of development tools and SDKs that simplify the complexities of web3 development. With features like customizable wallet components, smart contract deployment and interaction, and enterprise-grade infrastructure, thirdweb is at the forefront of enabling developers to build on any EVM-compatible chain.

**Seamless Integration for Scalable dApps**

Integrating thirdweb's SDK allows developers to leverage:

* **Simplified Development Workflow**: Utilize thirdweb's SDK to abstract away the complexities of smart contract development, enabling a focus on building the core application logic.
* **Enhanced Scalability and Efficiency**: Ensure high transaction throughput and reduced costs, making your dApps more scalable and user-friendly.
* **Comprehensive Tooling**: From smart contract deployment to user authentication and wallet management, thirdweb provides all the necessary tools to build, deploy, and manage your dApps.
* **Enterprise-Grade Infrastructure**: thirdweb's Engine offers a backend server solution for reliable smart contract calls, managed backend wallets, and high transaction throughput, all of which are crucial for building professional-grade applications.

**Building for the Future**

By leveraging thirdweb's tooling on Vanar Chain, developers are equipped with the tools and infrastructure needed to build the next generation of dApps. This integration not only simplifies the development process but also opens up new possibilities for innovation in the web3 space, making blockchain technology more accessible and usable for a wider audience.

Embark on your journey to build scalable, efficient, and innovative dApps with thirdweb's comprehensive web3 development toolkit.


# Connect

Seamlessly onboard and authenticate users in your applications.

<table data-view="cards"><thead><tr><th></th><th></th><th data-hidden data-card-cover data-type="files"></th><th data-hidden data-card-target data-type="content-ref"></th></tr></thead><tbody><tr><td><strong>Sign-in</strong></td><td>Flexible user sign-up flow with wallet and social sign-in methods</td><td><a href="https://content.gitbook.com/content/gUode1088gE1VUSxIx5w/blobs/z7TCaHiWlB6HQAmI8S1m/sign-in.svg">sign-in.svg</a></td><td><a href="https://portal.thirdweb.com/wallets/connect">https://portal.thirdweb.com/wallets/connect</a></td></tr><tr><td>Account Abstraction</td><td>Complete toolkit for Account Abstraction</td><td><a href="https://content.gitbook.com/content/gUode1088gE1VUSxIx5w/blobs/1S63EofevJKc1OmqC8KB/account-abstraction.svg">account-abstraction.svg</a></td><td><a href="https://portal.thirdweb.com/wallets/smart-wallet">https://portal.thirdweb.com/wallets/smart-wallet</a></td></tr><tr><td><strong>In-App Wallet</strong></td><td>Email &#x26; social login wallets for your customers</td><td><a href="https://content.gitbook.com/content/gUode1088gE1VUSxIx5w/blobs/NzmdZ9NaAyIOa7jsg87S/in-app%20wallet.svg">in-app wallet.svg</a></td><td><a href="https://portal.thirdweb.com/wallets/embedded-wallet/overview">https://portal.thirdweb.com/wallets/embedded-wallet/overview</a></td></tr><tr><td><strong>Auth</strong></td><td>Authenticate users with their wallets</td><td><a href="https://content.gitbook.com/content/gUode1088gE1VUSxIx5w/blobs/3gTG2rHMedMKp233C5aj/auth.svg">auth.svg</a></td><td><a href="https://portal.thirdweb.com/wallets/auth">https://portal.thirdweb.com/wallets/auth</a></td></tr><tr><td><strong>Pay</strong></td><td>Easily integrate cross-chain crypto purchases for your users</td><td><a href="https://content.gitbook.com/content/gUode1088gE1VUSxIx5w/blobs/bnW4cTzxantx4ZczkGEq/pay.svg">pay.svg</a></td><td><a href="https://portal.thirdweb.com/connect/pay/buy-with-crypto">https://portal.thirdweb.com/connect/pay/buy-with-crypto</a></td></tr><tr><td><strong>Blockchain API</strong></td><td>Performant, and reliable blockchain API</td><td><a href="https://content.gitbook.com/content/gUode1088gE1VUSxIx5w/blobs/KVVPAmQNbh1skffDwUFo/blockchain-api.svg">blockchain-api.svg</a></td><td><a href="https://portal.thirdweb.com/connect/blockchain-api">https://portal.thirdweb.com/connect/blockchain-api</a></td></tr></tbody></table>


# Contracts

Tools to easily create, deploy, and manage smart contracts.

<table data-view="cards"><thead><tr><th></th><th></th><th data-hidden data-card-cover data-type="files"></th><th data-hidden data-card-target data-type="content-ref"></th></tr></thead><tbody><tr><td><strong>Deploy</strong></td><td>Contract deployment build for any use-case</td><td><a href="https://content.gitbook.com/content/gUode1088gE1VUSxIx5w/blobs/qUEN8Ev6tIza9iYRsfb7/nav-icon-deploy.svg">nav-icon-deploy.svg</a></td><td><a href="https://portal.thirdweb.com/contracts/deploy/overview">https://portal.thirdweb.com/contracts/deploy/overview</a></td></tr><tr><td><strong>Build</strong></td><td>Write your own smart contracts</td><td><a href="https://content.gitbook.com/content/gUode1088gE1VUSxIx5w/blobs/snykgXRfixzNLx22b8Lc/nav-icon-build.svg">nav-icon-build.svg</a></td><td><a href="https://portal.thirdweb.com/contracts/build/overview">https://portal.thirdweb.com/contracts/build/overview</a></td></tr><tr><td><strong>Interact</strong></td><td>Add smart contract interactions in your app</td><td><a href="https://content.gitbook.com/content/gUode1088gE1VUSxIx5w/blobs/zEccn6Ye4mVdIXcUjgAm/nav-icon-interact.svg">nav-icon-interact.svg</a></td><td><a href="https://portal.thirdweb.com/contracts/interact/overview">https://portal.thirdweb.com/contracts/interact/overview</a></td></tr><tr><td><strong>Explore</strong></td><td>Ready-to-deploy contracts</td><td><a href="https://content.gitbook.com/content/gUode1088gE1VUSxIx5w/blobs/zOEe0cmOa0eyu8S1Vysc/nav-icon-explore.svg">nav-icon-explore.svg</a></td><td><a href="https://portal.thirdweb.com/contracts/explore/overview">https://portal.thirdweb.com/contracts/explore/overview</a></td></tr><tr><td><strong>Publish</strong></td><td>Publish your contracts on-chain</td><td><a href="https://content.gitbook.com/content/gUode1088gE1VUSxIx5w/blobs/x06a1LL0k4Cq5Ziqp2ly/nav-icon-publish.svg">nav-icon-publish.svg</a></td><td><a href="https://portal.thirdweb.com/contracts/publish/overview">https://portal.thirdweb.com/contracts/publish/overview</a></td></tr></tbody></table>


# Engine

### Overview

Engine is an open-source, backend server that reads, writes, and deploys contracts at production scale.

### Why use Engine?

Engine enables your app to:

* Send multiple blockchain transactions at once.
* Resubmit stuck transactions, handling nonce values, gas settings, and RPC errors.
* Avoid duplicate transactions.
* Manage multiple backend wallets and their funds.
* Control access from your backends and team members.
* Sponsor user gas fees.
* Deploy and interact with smart accounts.
* Subscribe to contract events and transactions.

<table data-view="cards"><thead><tr><th></th><th></th><th data-hidden data-card-cover data-type="files"></th><th data-hidden data-card-target data-type="content-ref"></th></tr></thead><tbody><tr><td><strong>Engine</strong></td><td>Backend server to reliably call smart contracts</td><td><a href="https://content.gitbook.com/content/gUode1088gE1VUSxIx5w/blobs/x3YbYBQkxXdzwAZeUf9U/nav-icon-engine.svg">nav-icon-engine.svg</a></td><td><a href="https://portal.thirdweb.com/infrastructure/engine/overview">https://portal.thirdweb.com/infrastructure/engine/overview</a></td></tr></tbody></table>


# SDKs

Build web3 applications that can interact with your smart contracts using our powerful SDKs and CLI.

<table data-view="cards"><thead><tr><th></th><th data-hidden data-card-cover data-type="files"></th><th data-hidden data-card-target data-type="content-ref"></th></tr></thead><tbody><tr><td><strong>Typescript</strong></td><td><a href="https://content.gitbook.com/content/gUode1088gE1VUSxIx5w/blobs/8HW5jRQH17QUfXP2vXbO/nav-icon-typescript.svg">nav-icon-typescript.svg</a></td><td><a href="https://portal.thirdweb.com/typescript/v5">https://portal.thirdweb.com/typescript/v5</a></td></tr><tr><td><strong>React</strong></td><td><a href="https://content.gitbook.com/content/gUode1088gE1VUSxIx5w/blobs/2FaD5v62hdUyaNSaivni/nav-icon-react.svg">nav-icon-react.svg</a></td><td><a href="https://portal.thirdweb.com/typescript/v5/react">https://portal.thirdweb.com/typescript/v5/react</a></td></tr><tr><td><strong>Unity</strong></td><td><a href="https://content.gitbook.com/content/gUode1088gE1VUSxIx5w/blobs/KNqR0R6MiTmf4UplPddQ/unity.svg">unity.svg</a></td><td><a href="https://portal.thirdweb.com/unity">https://portal.thirdweb.com/unity</a></td></tr><tr><td><strong>Solidity</strong></td><td><a href="https://content.gitbook.com/content/gUode1088gE1VUSxIx5w/blobs/38NEht6dFI8xrtdK0YIS/nav-icon-solidity.svg">nav-icon-solidity.svg</a></td><td><a href="https://portal.thirdweb.com/contracts/build/overview">https://portal.thirdweb.com/contracts/build/overview</a></td></tr><tr><td>.NET</td><td><a href="https://content.gitbook.com/content/gUode1088gE1VUSxIx5w/blobs/RqblX4BR4K5gd9dCBVl2/dot-net.svg">dot-net.svg</a></td><td><a href="https://portal.thirdweb.com/dotnet">https://portal.thirdweb.com/dotnet</a></td></tr></tbody></table>


# Tutorials

Learn more about how to deploy contracts on Vanar and Vanguard testnet

<table data-view="cards"><thead><tr><th></th><th></th><th></th><th data-hidden data-card-target data-type="content-ref"></th></tr></thead><tbody><tr><td>Deploy an ERC20 token contract</td><td></td><td></td><td><a href="/builders/for-developers/tutorials/deploy-a-token-contract-erc20">Deploy a Token Contract - ERC20</a></td></tr><tr><td>Deploy an ERC721 NFT token contract</td><td></td><td></td><td><a href="/builders/for-developers/tutorials/deploy-an-nft-contract-erc721">Deploy an NFT Contract - ERC721</a></td></tr><tr><td>Deploy an ERC20 token contract using thirdweb</td><td></td><td></td><td><a href="/builders/for-developers/tutorials/deploy-a-token-contract-erc20-thirdweb">Deploy a Token Contract - ERC20 (Thirdweb)</a></td></tr><tr><td>Deploy an ERC721 NFT token contract using thirdweb</td><td></td><td></td><td><a href="/builders/for-developers/tutorials/deploy-an-nft-contract-erc721-thirdweb">Deploy an NFT Contract - ERC721 (Thirdweb)</a></td></tr></tbody></table>


# Deploy a Token Contract - ERC20

Deploying an ERC-20 token on Vanar chain is a straightforward process if you have some experience with Ethereum development. Below is a step-by-step tutorial on how to deploy an ERC-20 token using Hardhat, a popular Ethereum development framework. Make sure you have Node.js and npm installed before you begin. Below are the libraries and tools used for this tutorial:

* **OpenZeppelin** - used for standard ERC20 base contract that is well tested and used by many production scale projects
* **Hardhat** - is a tool and an environment that helps you compile, build, deploy and test you smart contracts along many other features.

#### Prerequisites:

1. Node.js and npm installed on your machine.
2. Basic knowledge of Solidity and Ethereum development.

#### Step 1: Set Up a New Hardhat Project

If you don't already have a Hardhat project, you can create one by following these steps:

* Create a new directory for your project and navigate to it in the terminal:

{% code overflow="wrap" %}

```bash
mkdir my-erc20-token
cd my-erc20-token
```

{% endcode %}

* Initialize a new Node.js project with npm:

```bash
npm init -y
```

* Install Hardhat as a development dependency:

{% code overflow="wrap" %}

```bash
npm install --save-dev hardhat
```

{% endcode %}

* Initialize Hardhat in your project:

{% code overflow="wrap" %}

```bash
npx hardhat
```

{% endcode %}

Follow the prompts to configure your project.

#### Step 2: Write the ERC-20 Token Contract

Now, you'll need to create a Solidity smart contract for your ERC-20 token. Create a new file called `Token.sol` in the `contracts` directory.

Here's a basic example of an ERC-20 contract:

{% code overflow="wrap" %}

```solidity
// contracts/Token.sol
// SPDX-License-Identifier: MIT
pragma solidity ^0.8.0;

import "@openzeppelin/contracts/token/ERC20/ERC20.sol";

contract TestToken is ERC20 {
    constructor(uint256 initialSupply) ERC20("Test Token", "MNA") {
        _mint(msg.sender, initialSupply);
    }
}
```

{% endcode %}

* Make sure to install OpenZeppelin's ERC-20 library if you haven't already:

{% code overflow="wrap" %}

```bash
npm install @openzeppelin/contracts
```

{% endcode %}

#### Step 3: Configure Hardhat

In your Hardhat project, configure the deployment by modifying the `hardhat.config.js` file. You can specify the network, account, and other settings for deployment.

Here's an example configuration:

{% code overflow="wrap" %}

```javascript
// hardhat.config.js
require("@nomiclabs/hardhat-waffle");
require("@nomiclabs/hardhat-ethers");
require("@nomiclabs/hardhat-etherscan");

module.exports = {
  networks: {
    // Add network configurations here (e.g., for local development, testnets, or mainnet).
    VANAR_TESTNET:{
      url: "RPC_VANAR_VANGAURD",
      accounts: ["PRIVATE_KEY_OF_THE_DEPLOYER"],
      chainId: 7860
    }
  },
  etherscan: {
    apiKey: "YOUR_ETHERSCAN_API_KEY", // Replace with your Etherscan API key
  },
  vanar: {
    apiKey: "YOUR_VANAR_API_KEY", // Replace with your VANAR API key
  }
  solidity: "0.8.0",
};
```

{% endcode %}

**Step 4: Deploy the ERC-20 Token**

Now, you can deploy your ERC-20 token using Hardhat. Create a deployment script in the `scripts` directory (e.g., `deployERC20.js`) to deploy the contract:

{% code overflow="wrap" %}

```javascript
mkdir my-erc20-token
// scripts/deployERC20.js
const { ethers, upgrades } = require("hardhat");

async function main() {

  const maxSupply = 1000000 * (10 ** 18); // To mint 1,000,000 tokens

  const [deployer] = await ethers.getSigners();

  console.log("Deploying TestToken from account:", deployer.address);

  const TestToken = await ethers.getContractFactory("TestToken");
  const testToken = await TestToken.deploy(maxSupply); // Initial supply

  console.log("TestToken deployed to:", testToken.address);

  await testToken.deployed();
}

main()
  .then(() => process.exit(0))
  .catch((error) => {
    console.error(error);
    process.exit(1);
  });

```

{% endcode %}

#### Step 5: Deploy the Token

Run the deployment script using Hardhat:

{% code overflow="wrap" %}

```bash
npx hardhat run scripts/deployERC20.js --network <network_name>
```

{% endcode %}

Replace `<network_name>` with the configured Vanar network you want to deploy the token on.

####

That's it! You've deployed an ERC-20 token using Hardhat on Vanar. Make sure to test your token and handle any additional functionalities such as transfers, approvals, and more if needed.


# Deploy an NFT Contract - ERC721

Deploying an ERC-721 token contract for NFTs on Vanar chain is a straightforward process that is exact similar to what is explained in '[Deploy a Token Contract - ERC20](/builders/for-developers/tutorials/deploy-a-token-contract-erc20)'. The only difference is down to the smart contract level which is different to an ERC20 token contract.&#x20;

Below are the libraries and tools used for this tutorial:

* **OpenZeppelin** - used for standard ERC20 base contract that is well tested and used by many production scale projects
* **Hardhat** - is a tool and an environment that helps you compile, build, deploy and test you smart contracts along many other features.

#### Prerequisites:

1. Node.js and npm installed on your machine.
2. Basic knowledge of Solidity and Ethereum development.

#### Step 1: Set Up a New Hardhat Project

If you don't already have a Hardhat project, you can create one by following these steps:

* Create a new directory for your project and navigate to it in the terminal:

{% code overflow="wrap" %}

```bash
mkdir my-erc721-token
cd my-erc721-token
```

{% endcode %}

* Initialize a new Node.js project with npm:

```bash
npm init -y
```

* Install Hardhat as a development dependency:

{% code overflow="wrap" %}

```bash
npm install --save-dev hardhat
```

{% endcode %}

* Initialize Hardhat in your project:

{% code overflow="wrap" %}

```bash
npx hardhat
```

{% endcode %}

Follow the prompts to configure your project.

#### Step 2: Write the ERC-721 Token Contract

Now, you'll need to create a Solidity smart contract for your ERC-721 token. Create a new file called `Token721.sol` in the `contracts` directory.

Here's a basic example of an ERC-721 contract:

{% code overflow="wrap" %}

```solidity
// contracts/Token.sol
// SPDX-License-Identifier: MIT
pragma solidity ^0.8.0;

import "@openzeppelin/contracts/token/ERC721/ERC721.sol";
import "@openzeppelin/contracts/access/Ownable.sol";

contract TestNFT is ERC721, Ownable {
    constructor() ERC721("Test NFT", "NFT") {}

    function mint(address to, uint256 tokenId) public onlyOwner {
        _mint(to, tokenId);
    }
}
```

{% endcode %}

* Make sure to install OpenZeppelin's ERC-721 library if you haven't already:

{% code overflow="wrap" %}

```bash
npm install @openzeppelin/contracts
```

{% endcode %}

#### Step 3: Configure Hardhat

In your Hardhat project, configure the deployment by modifying the `hardhat.config.js` file. You can specify the network, account, and other settings for deployment.

Here's an example configuration:

{% code overflow="wrap" %}

```javascript
// hardhat.config.js
require("@nomiclabs/hardhat-waffle");
require("@nomiclabs/hardhat-ethers");
require("@nomiclabs/hardhat-etherscan");

module.exports = {
  networks: {
    // Add network configurations here (e.g., for local development, testnets, or mainnet).
    VANAR_TESTNET:{
      url: "RPC_VANAR_VANGAURD",
      accounts: ["PRIVATE_KEY_OF_THE_DEPLOYER"],
      chainId: 7860
    }
  },
  etherscan: {
    apiKey: "YOUR_ETHERSCAN_API_KEY", // Replace with your Etherscan API key
  },
  vanar: {
    apiKey: "YOUR_VANAR_API_KEY", // Replace with your VANAR API key
  }
  solidity: "0.8.0",
};
```

{% endcode %}

**Step 4: Deploy the ERC-20 Token**

Now, you can deploy your ERC-20 token using Hardhat. Create a deployment script in the `scripts` directory (e.g., `deploy721.js`) to deploy the contract:

{% code overflow="wrap" %}

```javascript
mkdir my-erc721-token
// scripts/deploy721.js
const { ethers, upgrades } = require("hardhat");

async function main() {
  const [deployer] = await ethers.getSigners();

  console.log("Deploying TestNFT from account:", deployer.address);

  const TestNFT = await ethers.getContractFactory("TestNFT");
  const testNFT = await TestNFT.deploy();

  console.log("TestNFT deployed to:", testNFT.address);

  await testNFT.deployed();
}

main()
  .then(() => process.exit(0))
  .catch((error) => {
    console.error(error);
    process.exit(1);
  });

```

{% endcode %}

#### Step 5: Deploy the NFT Contract

Run the deployment script using Hardhat:

{% code overflow="wrap" %}

```bash
npx hardhat run scripts/deploy721.js --network <network_name>
```

{% endcode %}

Replace `<network_name>` with the configured VANAR network you want to deploy the token on.

####

That's it! You've deployed an ERC-721 token contract using Hardhat on VANAR. Make sure to test your token and handle any additional functionalities such as transfers, approvals, and more if needed.


# Deploy a Token Contract - ERC20 (Thirdweb)

Using Thirdweb's deployment dashboard anyone can deploy their own tokens easily. This guide will walk you through how to deploy your very own token for your own projects and/or for learning purposes.&#x20;

1. Ensure you have test $VANRY/$VG token in the wallet you will use to deploy token contract by going to <https://faucet.vanarchain.com>. &#x20;
2. Go to third web: <https://thirdweb.com/thirdweb.eth/TokenERC20>
3. Connect wallet & Sign in.
4. Hit Deploy Button.
5. Fill in Image, Name, Symbol & Description for you ERC20 Token.<br>

   <figure><img src="https://content.gitbook.com/content/gUode1088gE1VUSxIx5w/blobs/2Of7utPG9TBBvKzSFbJ8/image.png" alt=""><figcaption></figcaption></figure>
6. Set the destination wallet for the newly minted tokens to go to.

<figure><img src="https://content.gitbook.com/content/gUode1088gE1VUSxIx5w/blobs/mBbSfjrxlW4XOrbDV6Bc/image.png" alt=""><figcaption></figcaption></figure>

7. Select Vanguard as deployment network.

<figure><img src="https://content.gitbook.com/content/gUode1088gE1VUSxIx5w/blobs/X1uXYU4fxjjQgBA5Tr4Q/image.png" alt=""><figcaption></figcaption></figure>

8. Hit deploy button and you'll get the following.

<figure><img src="https://content.gitbook.com/content/gUode1088gE1VUSxIx5w/blobs/1R8Kqz3uVxD0em2XPCOD/image.png" alt=""><figcaption></figcaption></figure>

9. Complete the second transaction and signing.
10. You will be redirected to your tokens dashboard with some additional steps.

<figure><img src="https://content.gitbook.com/content/gUode1088gE1VUSxIx5w/blobs/nPoVmd4dEflqgCdz300R/image.png" alt=""><figcaption></figcaption></figure>

### CONGRATULATIONS ON DEPLOYING YOUR FIRST TOKEN!&#x20;

11. Check out third web and the different options you have for your token.&#x20;
    1. Try minting your first tokens.
    2. Look at how you can start building your own app around your token.
    3. Mint tokens, and create a liquidity pool on a DEX.
    4. Send some tokens to your friends or another wallet.


# Deploy an NFT Contract - ERC721 (Thirdweb)

Using Thirdweb's deployment dashboard anyone can deploy their own NFT contracts easily. This guide will walk you through how to deploy your very own NFT Contract for your own projects and/or for learning purposes.&#x20;

1. Ensure you have test $VANRY/$VG token in the wallet you will use to deploy NFTcontract by going to <https://faucet.vanarchain.com>. &#x20;
2. Go to third web: <https://thirdweb.com/thirdweb.eth/DropERC721>
3. Connect wallet & Sign in.
4. Hit Deploy Button.
5. Fill in image, name, symbol & description for your ERC721 NFT Contract, Define Royalties, royalties recipient address and primary sale address.

<figure><img src="https://content.gitbook.com/content/gUode1088gE1VUSxIx5w/blobs/BKOuG9ZiDLAlYoTc2hNf/image.png" alt=""><figcaption></figcaption></figure>

7. Select Vanguard as deployment network.

<figure><img src="https://content.gitbook.com/content/gUode1088gE1VUSxIx5w/blobs/X1uXYU4fxjjQgBA5Tr4Q/image.png" alt=""><figcaption></figcaption></figure>

6. Hit the deploy button and sign the 2 transactions

<figure><img src="https://content.gitbook.com/content/gUode1088gE1VUSxIx5w/blobs/HCT5CGwoie090rdAyinm/image.png" alt=""><figcaption></figcaption></figure>

7. You'll be redirected to third web dashboard with more actions for you to do.

<figure><img src="https://content.gitbook.com/content/gUode1088gE1VUSxIx5w/blobs/AvNClPVutduEZnq1vRsp/image.png" alt=""><figcaption></figcaption></figure>

### CONGRATULATIONS ON DEPLOYING YOUR NFT CONTRACT!&#x20;

11. Check out third web and the different options you have for your NFTs.&#x20;
    1. Upload your first NFTs
    2. Set claim NFTs conditions
    3. Mint your first NFT


# Vanguard

Welcome to our testnet documentation.

## Begin your journey with Vanguard testnet today

<table data-view="cards"><thead><tr><th></th><th></th><th></th></tr></thead><tbody><tr><td><a href="/builders/vanguard/explorer">Explorer</a></td><td>Find our more about our explorer.</td><td></td></tr><tr><td><a href="/builders/vanguard/faucet">Faucet</a></td><td>Learn about testnet faucets and get your testnet tokens.</td><td></td></tr><tr><td><a href="/builders/vanguard/test-usdvg">$VG Token</a></td><td>Learn about the importance of testnet tokens.</td><td></td></tr><tr><td><a href="/builders/for-developers/vanar-network-details">Vanguard RPC Details</a></td><td>Get vanguard RPC details to begin your development journey!</td><td></td></tr><tr><td><a href="/builders/for-developers/adding-network-to-wallet">Connect wallet to Vanguard</a></td><td>Learn how to connect our testnet to your wallet.</td><td></td></tr></tbody></table>


# Explorer

You can visit our vanguard explorer at: <https://explorer-vanguard.vanarchain.com>&#x20;

#### Introduction to Block Explorers

Block explorers are web-based applications that allow users to search and analyze the blocks of a blockchain, transactions, smart contracts, and addresses. They are crucial for transparency in the blockchain ecosystem, enabling users to verify transactions and understand blockchain activity. For EVM-based blockchains like Vanar Chain, block explorers can also provide insights into gas fees, token transfers, and the activity of decentralized applications (dApps).

#### Getting Started with a Block Explorer

1. **Go to Vanguards Block Explorer**: First, head over to <https://explorer-vanguard.vanarchain.com/>.

   <figure><img src="https://content.gitbook.com/content/gUode1088gE1VUSxIx5w/blobs/kO76Ev5OvqrPke8nHYoS/image.png" alt=""><figcaption></figcaption></figure>
2. **Navigating the Interface**: Upon visiting our block explorer, you'll find a search bar at the top, where you can enter transaction hashes, block numbers, wallet addresses, or contract addresses. The homepage also displays the latest blocks and transactions, along with network statistics such as the current gas price.

#### Searching for Transactions

1. **Using the Search Bar**: To look up a transaction, you can paste its hash into the search bar. This will bring up a page displaying the transaction's details, including its status (success or fail), the block it was included in, the from and to addresses, the amount transferred, and the gas fees paid.

   <figure><img src="https://content.gitbook.com/content/gUode1088gE1VUSxIx5w/blobs/1S9hJ2QV54ARIztNv2ll/image.png" alt=""><figcaption></figcaption></figure>
2. **Understanding Transaction Details**: The transaction details page provides insights into the transaction's execution. For instance, the "Gas Used" field shows how much gas the transaction consumed, while the "Nonce" field represents the number of transactions sent from the sender's address.

   <figure><img src="https://content.gitbook.com/content/gUode1088gE1VUSxIx5w/blobs/DziqLUKycJe35Oba9Rlj/image.png" alt=""><figcaption></figcaption></figure>

#### Exploring Blocks and Addresses

1. **Blocks**: Clicking on a block number will reveal details about that block, such as the miner, the number of transactions it contains, and the total gas used. This information can be useful for understanding network activity and congestion at a specific point in time.
2. **Addresses**: When you search for an address, our block explorer will display its balance, transaction history, and tokens held. For smart contract addresses, you can also view the contract's source code (if verified) and read/write contract functions directly through the explorer.

#### Interacting with Smart Contracts

1. **Viewing Contract Information**: Verified smart contracts have their source code available on the block explorer, along with a detailed breakdown of transactions, events, and the contract's creator.
2. **Read/Write Functions**: For interactive contracts, the explorer may offer interfaces to directly interact with the contract's read (querying data without making a transaction) and write (making a transaction) functions. Contracts will need to be verified to be able to display these functions.

#### Advanced Features

1. **Token Tracking**: Block explorers can track ERC-20 (fungible tokens) and ERC-721 (NFTs) transactions associated with an address. This feature is particularly useful for investors and collectors to monitor their holdings.

   <figure><img src="https://content.gitbook.com/content/gUode1088gE1VUSxIx5w/blobs/Mhu98JM6CC983tBxM6y3/image.png" alt=""><figcaption><p>Tokens in image are tests and may not represent actual project association.</p></figcaption></figure>
2. **Gas Tracker**: Many explorers include a gas tracker that provides real-time data on the current gas prices, helping users to optimize transaction fees by choosing the best time to transact.
   1. However gas on vanry is fixed and tiered based on amount of gas being used, so its even easier to understand exactly how much gas you will be using.

#### Block Scout

Our block explorer is based on a self-hosted open source version of the block scout explorer for EVM chains.&#x20;


# Faucet

Go to our vanguard faucet at: <https://faucet.vanarchain.com/>

\ <mark style="color:yellow;">**Vanguard Faucet limits 1 test $VG every 6 hours.**</mark>

<figure><img src="https://content.gitbook.com/content/gUode1088gE1VUSxIx5w/blobs/jFQI2U1JqHinG5bfMSEN/image.png" alt=""><figcaption><p>Vanguard Testnet Interface</p></figcaption></figure>

#### Introduction to Token Faucets

Token faucets are online services that distribute free tokens or cryptocurrencies to users of a blockchain network. Specifically, on testnet chains like Vanguard, faucets provide testnet tokens that have no real-world value but are essential for developers and testers. These tokens allow users to conduct transactions, interact with smart contracts, and test applications in a sandbox environment that mimics the mainnet without risking actual assets.

#### Purpose of Token Faucets

The primary goal of a token faucet is to lower the entry barrier for developers and users who want to explore blockchain functionalities. By offering free tokens, faucets enable:

1. **Smart Contract Deployment**: Developers can deploy and test their smart contracts on the Vanguard testnet, ensuring their code behaves as expected in a controlled environment.
2. **Application Testing**: DApp developers can simulate user interactions and transactions within their applications, identifying and fixing bugs.
3. **Network Testing**: Faucets help in stress-testing the network, allowing for scalability tests and optimizations without the financial implications of mainnet testing.
4. **Educational Purposes**: They provide a hands-on experience for newcomers to learn blockchain operations, transaction mechanics, and the use of wallets without financial risks.

#### How Token Faucets Work

Token faucets operate through a web interface or an API that interacts with the Vanguard testnet blockchain. Users typically need to follow these steps to receive tokens:

1. **Visit the Faucet**: <https://faucet.vanarchain.com/>
2. **Enter Your Address**: Users input their Vanguard testnet wallet address where they wish to receive the tokens.
3. **Solve a CAPTCHA**: To prevent abuse and automated requests, faucets often require users to solve a CAPTCHA.
4. **Receive Tokens**: After submitting the request, the faucet sends 1 amount of testnet tokens to the provided address. There is a 6 hour wait time before being able to claim to the same wallet again.

#### Best Practices and Considerations

When using token faucets, keep the following in mind to ensure a smooth experience:

* **Security**: Only use faucets from reputable sources to avoid phishing attempts or scams.
* **Efficiency**: Be mindful of the request limits and plan your development and testing phases accordingly to make the most out of the available tokens.
* **Contribution**: If you’re able, contribute back to the faucet or the community, either by providing feedback or by reporting bugs.

Token faucets are invaluable resources for developers and enthusiasts exploring the capabilities of testnet chains like Vanguard. They facilitate a risk-free environment for testing, development, and education. By understanding how to efficiently use these faucets, individuals can accelerate their blockchain development journey, contribute to the ecosystem's growth, and ensure their projects are robust and ready for mainnet deployment.


# Test $VG

$VG is the name of Vanguard native test currency.

Go to <https://faucet.vanarchain.com/> to claim your testnet $VG tokens today!

### Introduction to Testnet Tokens

The importance of testnet tokens in the context of blockchain development and testing is fundamental to the innovation and refinement of blockchain applications. These tokens, which carry no real-world value, serve as an indispensable tool within the development lifecycle, providing a safe and cost-effective environment for experimentation, learning, and debugging. The value of testnet tokens lies not in their monetary worth but in their utility as facilitators of development and innovation, ensuring the stability and functionality of blockchain applications before they transition to a production environment.

#### Facilitating Development and Testing

Testnet tokens enable developers to deploy and interact with smart contracts on testnets. This environment is crucial for verifying the behavior of smart contracts under varied conditions, including different transaction volumes, interaction patterns, and potential edge cases. The absence of a cost barrier allows developers to conduct extensive testing, executing numerous transactions as needed to thoroughly vet their code. This ensures that applications are both efficient and secure before their official launch.

#### Risk-Free Environment

A significant advantage of using testnet tokens is the creation of a risk-free environment for experimentation. Since these tokens have no real-world value, developers and users can test the limits of their applications without the fear of financial repercussions. This encourages innovation and exploration, fostering the development of new ideas and concepts that might be too risky or expensive to test on the mainnet.

#### Scalability and Performance Testing

Testnet tokens also facilitate scalability and performance testing. Developers can simulate high-traffic conditions to test the load capacity of their applications and evaluate how smart contracts perform under stress. This is essential to ensure that applications can withstand real-world usage scenarios, avoiding issues like network congestion, slow transaction times, and vulnerabilities in smart contracts when deployed on the mainnet.

#### Educational Value

For newcomers to blockchain technology, testnet tokens offer an invaluable learning resource. They allow individuals to gain hands-on experience with transactions, smart contract interaction, and the functionalities of blockchain technology without the need for real funds. This democratizes access to blockchain education and development, lowering the entry barrier for those interested in entering the blockchain space.

#### Community Engagement and Feedback

Furthermore, testnets and their associated tokens play a critical role in community engagement. Developers, testers, and users interacting with testnets can provide essential feedback on usability, identify bugs, and suggest improvements. This collaborative effort between the community and developers ensures that the final product is polished, user-friendly, and meets the needs of its target audience.

#### Summary

In summary, testnet tokens are vital to the blockchain development ecosystem. They provide a secure, cost-effective platform for development, testing, and education, reducing financial barriers and encouraging experimentation. The ability to test applications on testnets with tokens that carry no real-world value contributes significantly to the quality and security of blockchain projects. As such, testnet tokens are indispensable in advancing and fostering the adoption of blockchain technology.


# Staking

As Vanar continues to push the boundaries of blockchain innovation, we are introducing Delegated Proof of Stake (DPoS) to complement our hybrid consensus mechanism. This update enhances network security, decentralization , and empowers the community to actively participate in the network's growth.

## What is DPoS?

Delegated Proof of Stake (DPoS) is a staking mechanism that allows users to stake their tokens and support trusted validators responsible for securing the network and validating transactions.

However, in Vanar’s unique approach, the Vanar Foundation selects the validators—ensuring they are reputable entities with proven track records—while the community stakes $VANRY tokens to these nodes to strengthen the network and earn rewards.


# How To Stake

Before we get started with staking, you need to be aware of the following important information:

* You need native VANRY tokens on Vanar network for staking.
* If you need to get native VANRY tokens on Vanar, refer to the [How To Get VANRY Tokens on Vanar ](#how-to-get-vanry-token-on-vanar-network)section for details.
* You need to have the Vanar network added to your preferred wallet. You can refer to [this section](/builders/for-developers/adding-network-to-wallet) to add the Vanar network to your wallet.
* There are no penalties for unstaking your tokens.
* Rewards are calculated and distributed periodically (every 24 hours).

Here is the step by step guide to staked your VANRY tokens:

#### Step 1: Access the Vanar dPoS Website

Visit the Vanar dPoS dApp at <http://staking.vanarchain.com>

Start by navigating to the Vanar dPoS platform. This is your central hub that allows you to stake $VANRY tokens, unstake your tokens and to claim the earned rewards. Here you can find detailed information on currently active validators including their APY, commission rates, rewards, and more.

Below is how the dPoS platform looks like. This is where you can browse through available validators, stake with them, check your account, view and claim your rewards etc.

<figure><img src="https://1788671450-files.gitbook.io/~/files/v0/b/gitbook-x-prod.appspot.com/o/spaces%2FgUode1088gE1VUSxIx5w%2Fuploads%2FtOodb6ea18YDoh9EvEff%2Fimage.png?alt=media&amp;token=ead82a36-b722-4c20-8339-c402535b90d7" alt=""><figcaption></figcaption></figure>

#### Step 2: Browse active validators

* Navigate to the "Staking Validators" section, where you will see a list of currently active validators. From here, you can select a validator to delegate your VANRY tokens and start earning rewards.
* Please note that each validator offers different APY, commission rates, rewards, and other specific details. Be sure to review each validator's detailed information carefully before you delegate your tokens to a validator.

Once on the platform, navigate to the "Staking Validators" section, where you’ll find currently active validators. Here, you can see which validators are open for delegation, along with key details such as APY, commission rates, and rewards. Remember that each validator may offer charge different commission on the earned rewards, so it’s important to review each option carefully before delegating your tokens with any validator.

#### Step 3: Select a Validator

* Choose the Validator you wish to support as a Delegator. Click on the "Become a Delegator" or ‘’Delegate’’ button to delegate your tokens.

After reviewing the available Validators, select one that aligns with your investment goals. Each Validator has specific terms, including APY, rewards, commission rates, and blockchain preferences. Be sure to review the details of each Validator carefully before proceeding as a Delegator. For this tutorial we will use the Vanar Community node to delegate the tokens.

<figure><img src="https://1788671450-files.gitbook.io/~/files/v0/b/gitbook-x-prod.appspot.com/o/spaces%2FgUode1088gE1VUSxIx5w%2Fuploads%2FgXgKbJOITvnvQVCFtaCX%2Fimage.png?alt=media&amp;token=a1f1c2c1-1570-484b-b885-9ae1b2546b90" alt="" width="375"><figcaption></figcaption></figure>

#### Step 4: Connect Your Wallet

* Click CONNECT WALLET and select your preferred wallet provider. Options include:
  * MetaMask
  * WalletConnect
  * Coinbase Wallet
* After selecting, connect and authorize the transaction using your wallet. Once connected successfully, your wallet address will appear in the top right corner.

To start delegating your tokens, connect your wallet to the Vanar dPoS platform. Your wallet will act as the gateway for delegating tokens and receiving rewards. Supported wallet options include MetaMask, WalletConnect, and Coinbase Wallet.&#x20;

<figure><img src="https://1788671450-files.gitbook.io/~/files/v0/b/gitbook-x-prod.appspot.com/o/spaces%2FgUode1088gE1VUSxIx5w%2Fuploads%2FVRIeANmPDsCEp1rSyAcR%2Fimage.png?alt=media&amp;token=7ab920f8-1089-448f-94aa-af200a06b06a" alt="" width="375"><figcaption></figcaption></figure>

Once connected you should see your wallet address with the VANRY token balance in the top right corner:

<figure><img src="https://1788671450-files.gitbook.io/~/files/v0/b/gitbook-x-prod.appspot.com/o/spaces%2FgUode1088gE1VUSxIx5w%2Fuploads%2FQRROMdm3WTslX61Q4iZE%2Fimage.png?alt=media&amp;token=1925396d-c655-4539-a2c8-414bd9349677" alt=""><figcaption></figcaption></figure>

#### Step 5: Enter Stake Amount

* Enter the amount you wish to delegate to the selected validator.
* Carefully review and accept the Terms and Conditions by marking the checkbox if you agree.
* Click on the ‘’Confirm’’ button to proceed.

Enter the amount you wish to delegate. Specify the number of tokens you want to delegate to your chosen validator.

The Vanar dPoS Terms and Conditions outline the responsibilities and requirements associated with becoming a Delegator, as well as the details regarding rewards, commission, and staking commitments. Carefully review each section to ensure you understand the terms fully. Once you’re ready and agree to the conditions, click the "Confirm" button to proceed with your delegation.

<br>

<figure><img src="https://1788671450-files.gitbook.io/~/files/v0/b/gitbook-x-prod.appspot.com/o/spaces%2FgUode1088gE1VUSxIx5w%2Fuploads%2FcsSzlWP067PYMq6oWNXg%2Fimage.png?alt=media&amp;token=c3682a72-990d-4d34-880c-304bbf7fede3" alt=""><figcaption></figcaption></figure>

#### Step 6: Review And Confirm Stake

* Review and confirm your delegation amount once again. If everything looks correct, click on the "Stake" button to complete the process.

Take a moment to review and confirm your delegation amount. This is your final opportunity to ensure that the number of tokens you’re delegating aligns with your intended commitment. Ensuring accuracy at this step is essential, as adjustments may not be possible immediately after confirming. If everything is correct and you’re ready to proceed, click on the "Stake" button to submit your delegation and start earning rewards.

<figure><img src="https://1788671450-files.gitbook.io/~/files/v0/b/gitbook-x-prod.appspot.com/o/spaces%2FgUode1088gE1VUSxIx5w%2Fuploads%2Fk79N5NmybMJ8DWlv2yBI%2Fimage.png?alt=media&amp;token=6186a8aa-19fb-42e6-baea-b660b729dd9c" alt=""><figcaption></figcaption></figure>

#### Step 7: Confirm in Wallet

* A pop-up window will appear from your wallet for final confirmation.
* Review the amount and estimated gas fee, then click "Confirm" if everything is correct.

Your connected wallet will prompt you to review the staking transaction details, including the amount of tokens you are staking and the estimated gas fee. This step ensures that you’ve double-checked everything before confirming the transaction on the blockchain. Once confirmed, the transaction becomes irreversible, so it’s important to carefully review the data!\ <br>

<figure><img src="https://1788671450-files.gitbook.io/~/files/v0/b/gitbook-x-prod.appspot.com/o/spaces%2FgUode1088gE1VUSxIx5w%2Fuploads%2FYM1ArR0J9Yuqu0Sekic0%2Fimage.png?alt=media&amp;token=7d40ec72-0e99-49d0-8cf7-63e1f242b648" alt=""><figcaption></figcaption></figure>

#### Step 8: Transaction Processing

* Wait for the transaction to be processed.
* Once confirmed, you will be redirected to "My Account" section.

The blockchain will now process your staking transaction. Depending on the network's congestion, this may take a few seconds. Once the transaction is confirmed by the network, your tokens will be successfully staked, and you’ll see a confirmation message like below.

<figure><img src="https://1788671450-files.gitbook.io/~/files/v0/b/gitbook-x-prod.appspot.com/o/spaces%2FgUode1088gE1VUSxIx5w%2Fuploads%2FNAe90ZpSBCW0bmNfkE5A%2F6ED4BA3D-7D35-428E-935A-6ADF9E5550FE_4_5005_c.jpeg?alt=media&amp;token=260e86a2-b023-41d3-aa24-d22ab0885aab" alt="" width="375"><figcaption></figcaption></figure>

Once the transaction is confirmed you will be redirected to the "My Account" section where you will see the list of validators you have delegated your tokens with.

#### Step 9: Check Your Account

* You can view your staked (Delegated) tokens under the "My Account" section.
* Track your earned rewards here, and unstake your tokens whenever needed.
* View your detailed history here, including actions like staking, unstaking, claiming rewards, and reclaiming your staked tokens.

Here, you can track your earned rewards and manage your delegation. You’ll be able to monitor your accumulated rewards in real time and see how your chosen validator is performing. Additionally, if you decide to end your delegation, you can easily unstake your tokens from this same interface.

<figure><img src="https://1788671450-files.gitbook.io/~/files/v0/b/gitbook-x-prod.appspot.com/o/spaces%2FgUode1088gE1VUSxIx5w%2Fuploads%2Fi1CMnTEX51hWvUnthPiK%2Fimage.png?alt=media&amp;token=bc4e80de-e9d4-44e8-8604-d7f20a7d4131" alt="" width="375"><figcaption></figcaption></figure>

#### Step 10: Transaction History explanation

In the transaction history, you can view all your past transactions.

<figure><img src="https://1788671450-files.gitbook.io/~/files/v0/b/gitbook-x-prod.appspot.com/o/spaces%2FgUode1088gE1VUSxIx5w%2Fuploads%2F5gjFYzi41lapsqJAdi70%2Fimage.png?alt=media&amp;token=7d87d751-1b53-4845-9d3e-fdbdbe1f36a3" alt=""><figcaption></figcaption></figure>

These transactions are organized into following 5 sections:

1. **All Transactions** - Shows all transactions without any filter.

2. **Stake**: Displays transactions related to staking (delegating) your tokens. The action/status is marked as "Staked."<br>

   <figure><img src="https://1788671450-files.gitbook.io/~/files/v0/b/gitbook-x-prod.appspot.com/o/spaces%2FgUode1088gE1VUSxIx5w%2Fuploads%2FCrSWtMZBCXG40sXbhVTV%2Fimage.png?alt=media&amp;token=82ff4ff8-3c8d-4228-88f2-8725c63b4663" alt=""><figcaption></figcaption></figure>

3. **Unstake**: Shows transactions related to token unstaking. It shows a timer showing the cooldown period left before you can claim your unstaked tokens like:

   <figure><img src="https://1788671450-files.gitbook.io/~/files/v0/b/gitbook-x-prod.appspot.com/o/spaces%2FgUode1088gE1VUSxIx5w%2Fuploads%2FyAnKlBcq5Ko8gn78Al18%2Fimage.png?alt=media&amp;token=ff8501d2-be52-4459-a271-f93451342d91" alt=""><figcaption></figcaption></figure>

   When your unstaked tokens are available to be claimed, you will see a 'Claim Now' button that helps you to claim them:

   <figure><img src="https://1788671450-files.gitbook.io/~/files/v0/b/gitbook-x-prod.appspot.com/o/spaces%2FgUode1088gE1VUSxIx5w%2Fuploads%2FCCsk99rjYJiLd6ULtm9X%2Fimage.png?alt=media&amp;token=a21f360e-4c34-4f24-a979-3bb095a54da5" alt="" width="563"><figcaption></figcaption></figure>

4. **Claim Stake**: Shows the transactions for the unstaked tokens you have claimed.

5. **Claim Rewards**: Shows the transactions for the rewards that you have claimed.

###

### How To Get VANRY Tokens On Vanar Network

There are multiple ways you can get VANRY tokens on Vanar network.

#### 1. Using a CEX

You can use one of the following centralized exchanges to buy the VANRY tokens:

* MEXC
* LBank
* Gate
* Bitget
* AscendEX
* Hotcoin
* CoinEX

Once you have tokens in your preferred centralized exchange wallet, you can withdraw them to the Vanar network using the withdrawal method available in the exchange app. Below is an example of how this process looks in the MEXC app on an iPhone. Make sure you select the Vanar network when withdrawing. Once the transaction is completed, you should be able to see the VANRY tokens in the wallet that you provided for the withdrawal.

<figure><img src="https://1788671450-files.gitbook.io/~/files/v0/b/gitbook-x-prod.appspot.com/o/spaces%2FgUode1088gE1VUSxIx5w%2Fuploads%2F9AMEgcnxU8HCxztzj9Bc%2Fimage.png?alt=media&amp;token=2e93f3a1-4cef-4e1e-b9b9-535ec002e20d" alt="" width="313"><figcaption></figcaption></figure>

#### 2. Using a DEX

You can also use a DEX to swap your USDC for VANRY on the Vanar network. [Auriswap](https://app.auriswap.com/) is a third-party DEX that can be used for this purpose.

If you don’t already have USDC on Vanar, you can always bridge it using your preferred bridge. Refer to the next section to learn how to bridge USDC or VANRY.

#### 3. Using a Bridge

If you have VANRY tokens in your ERC-20 wallet on Ethereum, you can bridge them using one of the available bridges, such as the Nitro Bridge. Simply select Ethereum as the source network and Vanar as the destination network to transfer your VANRY tokens. Once the transaction is completed, you should see the native VANRY tokens in your respective wallet address. Here is the link to the Nitro Bridge: <https://routernitro.com/>

Reference screenshot of the bridge:

<figure><img src="https://1788671450-files.gitbook.io/~/files/v0/b/gitbook-x-prod.appspot.com/o/spaces%2FgUode1088gE1VUSxIx5w%2Fuploads%2FsnFTbzz1yCCKI49TMW9n%2Fimage.png?alt=media&amp;token=6099818b-e12e-45e3-b3dd-86a59961480a" alt="" width="375"><figcaption></figcaption></figure>


# How To Unstake

#### IMPORTANT INFORMATION:

* There are no penalties for unstaking your tokens.
* There is no lockup period required to initiate an unstaking.
* After unstaking tokens, there is a 21-day cooldown period before the tokens become available for claiming.

It is recommended to review the [staking guide](/nodes-and-validators/staking/how-to-stake) before proceeding with this guide to gain a complete understanding of the platform and the unstaking process. Below is a step-by-step guide to unstake your staked VANRY tokens:

#### Step 1: Access the Vanar DPoS Website

First you need to visit the Vanar dPoS website at <http://staking.vanarchain.com>

#### Step 2: Connect Your Wallet

Then you need to connect your wallet that you have used to delegate some VANRY tokens to the validator(s). Make sure that the correct wallet is connected to the dApp - you can verify this by looking at the connected wallet in the top right corner of the dApp.

<figure><img src="https://1788671450-files.gitbook.io/~/files/v0/b/gitbook-x-prod.appspot.com/o/spaces%2FgUode1088gE1VUSxIx5w%2Fuploads%2FNH0hzzfGYM3UmbWS5xik%2Fimage.png?alt=media&amp;token=058cbc76-33b6-430c-a02d-0195e98e0168" alt=""><figcaption></figcaption></figure>

#### Step 3: Check Your Account

* You can view your staked (Delegated) tokens under the "My Account" section.
* Track your earned rewards here, and unstake your tokens whenever needed.
* View your detailed history here, including actions like staking, unstaking, claiming rewards, and reclaiming your staked tokens.

Here, you can track your earned rewards and manage your delegation. You’ll be able to monitor your accumulated rewards in real time and see how your chosen Validator is performing. Additionally, if you decide to end your delegation, you can easily unstake your tokens from this same interface.

<figure><img src="https://1788671450-files.gitbook.io/~/files/v0/b/gitbook-x-prod.appspot.com/o/spaces%2FgUode1088gE1VUSxIx5w%2Fuploads%2F5ri4VRJmpWeadzi16jrZ%2Fimage.png?alt=media&amp;token=8c2f2dc0-073a-4b0d-8e62-fae9970c0c77" alt="" width="375"><figcaption></figcaption></figure>

#### Step 4: Choose a Validator

* Choose the validator from which you want to unstake your tokens and click ‘’Unstake’’

Please note that there is a 21 days cooldown period before you can claim your tokens after unstaking.

Choose the validator from which you want to unstake your tokens. If you have delegated your tokens to only one validator, you can only unstake them from that one. If you have delegated your tokens to multiple validators, select the one you wish to unstake your tokens from.

#### Step 5: Enter Unstake Amount

* Enter the amount you wish to unstake from the selected Validator.
* Carefully review and accept the Terms and Conditions by marking the checkbox if you agree.
* Click on the ‘’CONFIRM’’ button to proceed.

Enter the amount you wish to Unstake. Specify the number of tokens you want to unstake from your chosen Validator.&#x20;

The Vanar DPoS Terms and Conditions outline the responsibilities and requirements associated with becoming a Delegator, as well as the details regarding rewards, commission, and staking commitments. Carefully review each section to ensure you understand the terms fully. Once you’re ready and agree to the conditions, click the "Confirm" button to proceed with your unstaking.

<figure><img src="https://1788671450-files.gitbook.io/~/files/v0/b/gitbook-x-prod.appspot.com/o/spaces%2FgUode1088gE1VUSxIx5w%2Fuploads%2Fa9gyqLMz4ItRsBpoIdrk%2Fimage.png?alt=media&amp;token=1aef80a8-e653-4354-96b7-df8de3a033a8" alt=""><figcaption></figcaption></figure>

#### Step 6: Review And Confirm Unstaking

* Review and confirm your unstaking amount once again. If everything looks correct, click on the "UNSTAKE" button to complete the process.

Take a moment to review and confirm your unstaking amount. This is your final opportunity to ensure that the number of tokens is the actual number you’re trying to unstake. If everything is correct and you’re ready to proceed, click on the "Unstake" button to submit your unstaking.

<figure><img src="https://1788671450-files.gitbook.io/~/files/v0/b/gitbook-x-prod.appspot.com/o/spaces%2FgUode1088gE1VUSxIx5w%2Fuploads%2FIdCCfzkYbEOkjJhXOBpI%2Fimage.png?alt=media&amp;token=53f9ce9d-8d26-4360-9d5d-e78d423d8127" alt=""><figcaption></figcaption></figure>

#### Step 7: Confirm in Wallet

* A pop-up window will appear from your wallet for final confirmation.
* Review the amount and estimated gas fee, then click CONFIRM if everything is correct.

Your connected wallet will prompt you to review the unstaking transaction details, including the amount of tokens you’re unstaking and the estimated gas fee. This step ensures that you’ve double-checked everything before confirming the transaction on the blockchain. Once confirmed, the transaction becomes irreversible, so it’s important to carefully review the data!

<figure><img src="https://1788671450-files.gitbook.io/~/files/v0/b/gitbook-x-prod.appspot.com/o/spaces%2FgUode1088gE1VUSxIx5w%2Fuploads%2FkJOwvpQ33kfznTpgRmCB%2Fimage.png?alt=media&amp;token=80a408ed-d8c0-465c-8322-80bf4414dca9" alt="" width="349"><figcaption></figcaption></figure>

#### Step 8: Transaction Processing

* Wait for the transaction to be processed.
* Once confirmed, a "Successfully Staked" message will appear.

The blockchain will now process your unstaking transaction. Depending on the network's congestion, this may take a few seconds or minutes. Once the transaction is confirmed by the network, your tokens will be successfully unstaked, and you’ll see a confirmation message.

<figure><img src="https://1788671450-files.gitbook.io/~/files/v0/b/gitbook-x-prod.appspot.com/o/spaces%2FgUode1088gE1VUSxIx5w%2Fuploads%2FPVyuYBaZJPR8FHmyG6Hv%2Fimage.png?alt=media&amp;token=15dd1d61-50cd-45c6-ac46-25ec9c4bd3a5" alt="" width="375"><figcaption></figcaption></figure>

#### Step 9: View Transaction History

Once the transaction is confirmed for unstaking, you will be redirected to "My Account" section. Here you can see the status of your unstaking request under "Transaction History" section. As there is a cooldown period of 21 days, you will notice a countdown showing the time left before you can claim your unstaked tokens. See below for reference:<br>

<figure><img src="https://1788671450-files.gitbook.io/~/files/v0/b/gitbook-x-prod.appspot.com/o/spaces%2FgUode1088gE1VUSxIx5w%2Fuploads%2F36ZEDLaG3mTMm4a3bB67%2Fimage.png?alt=media&amp;token=1b1e027d-5dff-4ced-89ba-079c5dcfd645" alt=""><figcaption></figcaption></figure>

<br>

#### Step 10: Claim Your Tokens After the 21 days Cooldown period

* Go to Transaction History, select the Unstake tab, and click "Claim Now"

After the 21-day cooldown period, you can claim your tokens. To do so, navigate to the "Transaction History" section. Under the Unstake tab, you will find the "Claim Now" button to complete the process.

<figure><img src="https://1788671450-files.gitbook.io/~/files/v0/b/gitbook-x-prod.appspot.com/o/spaces%2FgUode1088gE1VUSxIx5w%2Fuploads%2Fnel19j0Io25nPdfsQDG7%2Fimage.png?alt=media&amp;token=c423d6d2-d77d-4158-bc7e-e48adb9b4ebe" alt=""><figcaption></figcaption></figure>

#### Step 11: Verify Your Unstake Claim

* Review your unstake claim, and click ‘’Next’’

Your Unstake transaction summary is displayed here. Date of the unstake and unstake transaction hash can be reviewed.

<figure><img src="https://lh7-rt.googleusercontent.com/docsz/AD_4nXdlUOANkVqciw7Myacm01fg5QP1ItTDr2zEk-ngiFVj_awdXxdchu7wqfX8yJ63OHpnjJwHau1_9LKAeDtybiR3rxeb46PfgcO_JNnJEd39kY539SysHsUY1w1gcj-6ScE6-qiMPQ?key=VHbiTfkWNMqA01BF5ZQZ-m_4" alt=""><figcaption></figcaption></figure>

#### Step 12: Claim Confirmation

* Click on the ‘’Confirm’’ button to initiate your transaction

<figure><img src="https://lh7-rt.googleusercontent.com/docsz/AD_4nXf65HkjH4Pi7xF2HFhk904UaD1TjBGN2swSeuXETJSsyXqyjLzJcg_Y0kqC-wrW_P1az1OKjiEvHwGXBEhE7xPFJ4A-NEJGV5e66NjqAIrut15QBWWMgnmE-HP_53ojlVGOPw87?key=VHbiTfkWNMqA01BF5ZQZ-m_4" alt=""><figcaption></figcaption></figure>

#### Step 13: Confirm Claim in Wallet

* A pop-up window will appear from your wallet for final confirmation.
* Review the amount and estimated gas fee, then click CONFIRM if everything is correct.

Your connected wallet will prompt you to review the claim transaction details, including the amount of tokens you’re claiming and the estimated gas fee.&#x20;

<figure><img src="https://lh7-rt.googleusercontent.com/docsz/AD_4nXfCCwTuJKWCDH4rzQhcx_z40jhNf7MNVveR3BEQ1XHEHNXRK86vC5FtB-xUdPXJ1aORBDqDVnTdifgSL1iAsXniZmMoerWmXs7W_QipJ432hB0A9D97IDag1IWKkUx7cXXP8DZYLA?key=VHbiTfkWNMqA01BF5ZQZ-m_4" alt="" width="375"><figcaption></figcaption></figure>

<br>

#### Step 14: Claim Transaction Processing

* Wait for the transaction to be processed.

The blockchain will now process your claim transaction. Depending on the network's congestion, this may take a few seconds or minutes. Once the transaction is confirmed by the network, your tokens will be claimed in your wallet, and you’ll see a confirmation message.

<figure><img src="https://lh7-rt.googleusercontent.com/docsz/AD_4nXfnOWzxcGZK1fMZB8VXV4Do9H6QTNYxNf7-nmq6GO1aSI1q89m_P-g1PN1fXal3ncF1iFmYWkeYPZJRAuLzrv8H4gt6D9-0UHBWKZlx8TxBO-jLh0UhcY3zokpLf4wVLbodULOXAw?key=VHbiTfkWNMqA01BF5ZQZ-m_4" alt="" width="375"><figcaption></figcaption></figure>

Once completed, you will be redirected to "My Account" section.

<br>


# How To Claim Rewards

#### IMPORTANT INFORMATION:

* The delegators get the rewards based on the staked amount, APY and commission being charged by the validators.
* The rewards are calculated and distributed periodically (every 24 hours).
* Earned rewards can be claimed at anytime.
* There is no penalty on rewards in case you unstake your delegated tokens. You will get the earned rewards (if any) even after you have unstaked your tokens.

Here is step by step guide to claim the earned rewards:&#x20;

#### Step 1: Access the Vanar DPoS Website

First you need to visit the Vanar dPoS site at <http://staking.vanarchain.com>

#### Step 2: Connect Your Wallet

Then you need to connect your wallet that you have used to delegate some VANRY tokens to the validator(s). Make sure that the correct wallet is connected to the dApp - you can verify this by looking at the connected wallet in the top right corner of the dApp.

<figure><img src="https://1788671450-files.gitbook.io/~/files/v0/b/gitbook-x-prod.appspot.com/o/spaces%2FgUode1088gE1VUSxIx5w%2Fuploads%2F8t5V55pLxka0IW8mdDML%2Fimage.png?alt=media&amp;token=9f5efe78-6d1e-43fb-8c7c-40e4158c0a62" alt=""><figcaption></figcaption></figure>

#### Step 3: Check Your Account

* You can view your staked (Delegated) tokens under the "My Account" section.
* Track your earned rewards here, and unstake your tokens whenever needed.
* View your detailed history here, including actions like staking, unstaking, claiming rewards, and reclaiming your staked tokens.

Here, you can track your earned rewards and manage your delegation. You’ll be able to monitor your accumulated rewards in real time and see how your chosen validator is performing. Additionally, you can initiate the claim rewards process from the same interface.

<figure><img src="https://1788671450-files.gitbook.io/~/files/v0/b/gitbook-x-prod.appspot.com/o/spaces%2FgUode1088gE1VUSxIx5w%2Fuploads%2FLHDSSOE143BDIveCPxig%2Fimage.png?alt=media&amp;token=4fbb7d9f-ad88-4892-8936-cd24ffa71d5f" alt="" width="375"><figcaption></figcaption></figure>

#### Step 4: Initiate your Claim Reward process

* Select the validator from which you want to claim your reward, then click the "Claim Reward" button.

The process of claiming the earned rewards is very simple. All you need to do it to select the validator that you used to delegate your token. If you see any rewards showing for your connected wallet, then you are good to claim them right away. You just need to click on "Claim Rewards" and follow the process to claim the rewards. Also note that the earned rewards are separatley claimed if you have staked with multiple validators.

#### Step 5: Review And Confirm to Claim Your Reward

* Review and confirm your reward amount. Click on the "Confirm" button to start the process.

<figure><img src="https://1788671450-files.gitbook.io/~/files/v0/b/gitbook-x-prod.appspot.com/o/spaces%2FgUode1088gE1VUSxIx5w%2Fuploads%2FjRLSLIU62LP1lx1zYHiK%2Fimage.png?alt=media&amp;token=a6351409-22d3-419f-80db-f2263dcfa12a" alt="" width="375"><figcaption></figcaption></figure>

#### Step 7: Confirm in Wallet

* A pop-up window will appear from your wallet for final confirmation.
* Review the amount and estimated gas fee, then click CONFIRM if everything is correct.

Your connected wallet will prompt you to review the claim reward transaction details, including the amount of tokens you’re claiming and the estimated gas fee. This step ensures that you’ve double-checked everything before confirming the transaction on the blockchain. Once confirmed, the transaction becomes irreversible, so it’s important to carefully review the data!

<figure><img src="https://1788671450-files.gitbook.io/~/files/v0/b/gitbook-x-prod.appspot.com/o/spaces%2FgUode1088gE1VUSxIx5w%2Fuploads%2F6QE7mk16FrkavUPq7S3n%2Fimage.png?alt=media&amp;token=f26dcd7c-73a3-451b-8910-93b921d50d52" alt="" width="345"><figcaption></figcaption></figure>

#### Step 8: Transaction Processing

* Wait for the transaction to be processed.
* Once confirmed, you will be redirected to "My Account" section.

The blockchain will now process your claim reward transaction. Depending on the network's congestion, this may take a few seconds or minutes. Once the transaction is confirmed by the network, your tokens will be claimed in your Wallet.

<figure><img src="https://1788671450-files.gitbook.io/~/files/v0/b/gitbook-x-prod.appspot.com/o/spaces%2FgUode1088gE1VUSxIx5w%2Fuploads%2FxEtMiQ6f41IooDUdOVdc%2Fimage.png?alt=media&amp;token=14ac2387-eb4f-4070-aff5-29f59f5081fb" alt="" width="375"><figcaption></figcaption></figure>

#### Step 9: View Transaction History

Successful rewards claim is marked as ‘’Claimed’’. You can see all the rewards that you have claimed across all the validators under "Transaction History" in "Claim Reward" section.

<figure><img src="https://1788671450-files.gitbook.io/~/files/v0/b/gitbook-x-prod.appspot.com/o/spaces%2FgUode1088gE1VUSxIx5w%2Fuploads%2FbuHiDU1GB5NQiBkEqek2%2Fimage.png?alt=media&amp;token=fd5cf665-ffb2-451f-92e1-83e45cf717a3" alt=""><figcaption></figcaption></figure>


# Vanar Nodes

In order to interact with the Vanar chain you need to have access to the Vanar nodes. Normally you interact with these nodes via RPCs. The end users can interact with the blockchain via publicly available RPCs. You can also run your own nodes like an RPC node that gives you an exclusive access and faster data availability if you are building some applications for any use case.

There are different types of nodes that one can run in the Vanar ecosystem. You can learn how to run the RPC and validator nodes using the following link:

* [Run an RPC node](/nodes-and-validators/setup-a-rpc-node)
* [Run a validator node](/nodes-and-validators/setup-a-validator-node)


# Setup a RPC Node

In the blockchain networks, RPC (Remote Procedure Call) nodes are a critical component that enables communication between nodes on the network. The primary purpose of RPC nodes is to facilitate communication and interaction between nodes, enabling the network to function efficiently and securely.

### Pre-requisites:

* Software: A Linux-based operating system Ubuntu 22.04 with a compatible architecture ( x86\_64).
* Network connection: A stable and high-speed 10 Gbps internet connection.
* Minimum Hardware Requirements: A reliable server with a minimum of 8 CPU cores, 32 GB RAM, and 500 GB storage.
* Recommended Hardware Requirements: A reliable server with a minimum of 16 CPU cores, 64 GB RAM, and 1 TB storage.
* Preferred Region (low Carbon Data Centers): -
  * US (Lowa)
  * Europe: London, Finland

### Setting up an RPC node

#### Step 1: Choose a blockchain network

1. The blockchain network you are participating in is Vanarchain.
2. Ensure you understand the network's architecture, consensus algorithm, and RPC’s roles.
3. Familiarize yourself with the network's documentation, technical specifications, and community resources.

#### Step 2: Set up the environment

1. Install a Linux-based operating system Ubuntu 22.04 with a compatible architecture (x86\_64).
2. Configure the network settings, DNS, and firewall rules to allow port 30311 tcp/udp incoming connections.
3. Install [go](https://go.dev/) - version should 1.20.14

#### Step 3: Install dependencies and source code

1. Install the required dependencies, such as:

* git (for cloning the blockchain's repository)
* make (for building the blockchain's binary)
* gcc (for compiling the blockchain's code)

2. Clone the blockchain's repository using git clone:

`git clone https://github.com/VanarChain/vanarchain-blockchain.git`

This is the URL of the GitHub repository. It points to a specific directory within the repository.

3. Change into the cloned repository directory:

`cd vanarchain-blockchain`

* cd: This is a command that changes the current directory to a new location.
* vanarchain-blockchain: This is the name of the repository, which is also the directory name.

4. “git checkout v1.1.1”: Latest tag Sep 2024. You can see the the available versions at <https://github.com/VanarChain/vanarchain-blockchain/tags> and you should use the latest available version.
5. Run the make command to build the blockchain's binary:

`make all`

6. Copies the geth file from the build directory to the parent directory. Copies the bootnode file from the build directory to the parent directory. Changes the current directory to the parent directory.

`cp ./build/bin/geth  /usr/bin/geth`

* cp ./build/bin/geth  /usr/bin/geth: This is a command that copies a file from one location to another. It is executed as follows:
  * cp: This is the command that stands for "copy".
  * ./build/bin/geth: This is the source file to be copied. The ./ before build indicates that the directory is relative to the current directory.
  * /usr/bin/geth: This is the destination directory and filename where the file will be copied to. /usr/bin is a standard directory on Unix-like systems where executable programs are typically stored. geth is the name of the file to which the geth file will be copied.

So, this command copies the geth file from the build directory to the parent directory.

#### Step 4: Join the network

1. Connect to the network by establishing connections with other nodes (peers) and broadcasting your node's presence.
2. Validate transactions and blocks as a validator, following the network's consensus algorithm.

### RPC node creation commands

To create a new account on the Vanar network using the Geth command-line tool, follow these steps:

#### Create a new directory for your node

Create a new directory to store the blockchain data and other files:

`mkdir /node`

#### Running a new RPC node

To run a node on the Vanar network using the Geth command-line tool write the following code.

| `/usr/bin/geth --vanar --datadir /node/  --syncmode 'full' --port 30311 --txpool.rejournal 5m --txpool.globalslots 10240 --http --http.port 8545 --http.addr '0.0.0.0' --http.api 'eth,net,web3,txpool' --ws --ws.port 8546 --ws.addr '0.0.0.0' --ws.api 'eth,net,web3,txpool' --http.vhosts="*" --http.corsdomain "*" --ws.origins="*"` |
| ---------------------------------------------------------------------------------------------------------------------------------------------------------------------------------------------------------------------------------------------------------------------------------------------------------------------------------------- |

* /usr/bin/geth: The executable name is geth, and the path is /usr/bin/, which is the default location for executable files on Unix-like systems.
* \--vanar: This option tells Geth to start in "Vanar" mode, which is a specific configuration for the Vanar node.
* \--datadir /node/: This option sets the data directory for the node to /node/. This is where the node will store its blockchain data, including the blockchain itself, transactions, and contract storage.
* \--syncmode 'full': This option tells the node to start a full sync from the genesis block. This means the node will download the entire blockchain from the genesis block to the current tip.
* \--port 30311: This option sets the listening port for the node to 30311. This is the port that other nodes will use to connect to this node.
* \--txpool.rejournal 5m: This option sets the journal interval for the transaction pool to 5 minutes. When the node processes 5 minutes of transactions, it will restart the transaction pool to ensure that all transactions are processed.
* \--txpool.globalslots 10240: This option sets the global slots for the transaction pool to 10240. This determines the maximum number of transactions that can be stored in the transaction pool.
* \--http: This option enables the HTTP API for the node.
* \--http.port 8545: This option sets the port for the HTTP API to 8545.
* \--http.addr '0.0.0.0': This option sets the IP address for the HTTP API to 0.0.0.0, which means the API will listen on all available network interfaces.
* \--http.api 'eth,net,web3,txpool': This option specifies the API endpoints that will be available through the HTTP API. In this case, it's eth, net, web3, and txpool.
* \--ws: This option enables the WebSocket API for the node.
* \--ws.port 8546: This option sets the port for the WebSocket API to 8546.
* \--ws.addr '0.0.0.0': This option sets the IP address for the WebSocket API to 0.0.0.0, which means the API will listen on all available network interfaces.
* \--ws.api 'eth,net,web3,txpool': This option specifies the API endpoints that will be available through the WebSocket API. In this case, it's eth, net, web3, and txpool.
* \--http.vhosts "\*": This option sets the vhosts for the HTTP API to \*, which means the API will listen on all available domains.
* \--http.corsdomain "\*": This option sets the CORS domains for the HTTP API to \*, which means the API will allow requests from any domain.
* \--ws.origins "\*": This option sets the origins for the WebSocket API to \*, which means the API will allow connections from any origin.

#### RPC node as a service

We recommend using RPC as a service to avoid disconnection of the Vanar chain.

**Create log directory**&#x20;

Create the log directory using the following command: -

| `mkdir /var/log/vanarchain/` |
| ---------------------------- |

* mkdir: This is the command used to create new directories. The name stands for "make directory".
* /var/log/: This is a standard directory in Unix-like operating systems where log files are typically stored. It is used by various system services and applications to store their log files.
* vanarchain/: This is the name of the new directory being created within /var/log/. Here, the directory will be used to store log files related to the VanarChain service.

**Starting RPC service in Vanar chain**

The commands given below are for managing services on a Linux system, specifically for starting a service called vanarchain.service, It is for an RPC node in a Vanar chain network.

| <p><code>sudo systemctl daemon-reload</code><br><code>sudo systemctl start vanarchain.service</code></p> |
| -------------------------------------------------------------------------------------------------------- |

`sudo systemctl daemon-reload`

This command reloads the systemd manager configuration. It is necessary to run this command whenever you make changes to the service unit files (e.g., modifying or creating a new service file) so that systemd can recognize and apply those changes. The sudo part of the command indicates that administrative privileges are required to perform this action.

* sudo: Executes the command with superuser (root) privileges.
* systemctl: The command-line utility used to interact with the systemd system and service manager.
* daemon-reload: Tells systemd to reload its configuration files.

`sudo systemctl start vanarchain.service`

This command starts the vanarchain.service, which is the service responsible for running the VanarChain RPC node.

* sudo: Executes the command with superuser (root) privileges.
* systemctl: The command-line utility for managing systemd services.
* start: Tells systemd to start the specified service.
* vanarchain.service: The name of the service unit file that defines how to manage the VanarChain RPC node.

**Unit File**

| <p><code>\[Unit]</code><br><code>Description=vanarchain service</code><br><code>After=network.target</code><br><code>StartLimitIntervalSec=0</code><br><code>\[Service]</code><br><code>Type=simple</code><br><code>Restart=always</code><br><code>RestartSec=1</code><br><code>User=\<your OS User></code></p><p><br><code>StandardOutput=append:/var/log/vanarchain/vanarchain-err.log</code><br><code>StandardError=append:/var/log/vanarchain/vanarchain.log</code><br><br><code>\[Install]</code><br><code>WantedBy=multi-user.target</code></p> |
| ----------------------------------------------------------------------------------------------------------------------------------------------------------------------------------------------------------------------------------------------------------------------------------------------------------------------------------------------------------------------------------------------------------------------------------------------------------------------------------------------------------------------------------------------------- |

| ExecStart=/usr/bin/geth --vanar --datadir /node/  --syncmode 'full' --port 30311 --txpool.rejournal 5m --txpool.globalslots 10240 --http --http.port 8545 --http.addr '0.0.0.0' --http.api 'eth,net,web3,txpool' --ws --ws.port 8546 --ws.addr '0.0.0.0' --ws.api 'eth,net,web3,txpool' --http.vhosts="\*" --http.corsdomain "\*" --ws.origins="\*" |
| --------------------------------------------------------------------------------------------------------------------------------------------------------------------------------------------------------------------------------------------------------------------------------------------------------------------------------------------------- |

\[Unit] Section

* Description: Provides a brief description of what the service is. In this case, it describes it as the vanarchain service.
* After: Specifies that this service should start after the network.target, ensuring that the network is up before this service starts. This is important for services that require network connectivity.
* StartLimitIntervalSec: Setting this to 0 disables the rate limit for restarting the service. This means there is no limit on how frequently the service can restart within a specific time frame.

\[Service] Section

* Type=simple: Indicates that the service is a simple one and that systemd should consider the service running as soon as the process specified in ExecStart is started.
* Restart=always: Configures the service to always restart if it stops or crashes. This is useful for ensuring high availability.
* RestartSec=1: Specifies a delay of 1 second before attempting to restart the service after it stops.
* User=\<your OS User>: Specifies the user under which the service should run. You need to replace \<your OS User> with the actual username that should run the service. For example, you might replace it with vanarmain or another appropriate user.
* ExecStart: This specifies the command to start the service. You need to fill this in with the path to the executable or script that starts the vanarchain service.
* StandardOutput: Redirects the standard output (stdout) of the service to the specified log file (/var/log/vanarchain/vanarchain-err.log). The append: part means that it will append to the file rather than overwriting it.
* StandardError: Redirects the standard error (stderr) of the service to the specified log file (/var/log/vanarchain/vanarchain.log). Similarly, it will append to the file.

\[Install] Section

* Unit Configuration: Defines dependencies and description.
* Service Configuration: Specifies the service type, restart policies, user context, and logging.
* Install Configuration: Sets the target environment for the service.

### Verify the node

Verify that the node is running and syncing with the Vanar network.&#x20;

| `tail -f /var/log/vanarchain/vanarchain.log` |
| -------------------------------------------- |

* tail: This Unix command is used to display the last part of a file. By default, it shows the last 10 lines of the specified file.
* -f: This option stands for "follow". It tells tail to not only show the last part of the file but also to continually monitor the file for new lines and display them as they are added. This is useful for real-time monitoring.
* /var/log/vanarchain/vanarchain.log: This is the file path to the log file you want to monitor. In this case, it is the log file for the vanarchain service.

**Purpose**

When you run the above-given command, you are essentially setting up a real-time view of the vanarchain.log file. This can be very useful for:

* Monitoring Node Activity: Watching the log file allows you to see what the vanarchain node is doing in real time. This can include transactions being processed, blocks being added to the blockchain, and any errors or warnings that might occur.
* Debugging and Troubleshooting: If you are experiencing issues with your vanarchain node, monitoring the log file can provide insights into what might be going wrong. You can see error messages and other diagnostic information as they happen.
* Performance Monitoring: Keeping an eye on the log file can help you understand the performance of your node, such as how quickly it processes transactions or how often it syncs with other nodes.


# Setup a Validator Node

In a blockchain network, validator nodes are responsible for authenticating and validating transactions occurring on the network. These nodes ensure the security and integrity of the network by executing intricate mathematical calculations to verify that transactions comply with the network's rules. Upon successful validation, transactions are appended to the blockchain ledger, making them visible to all participants.

Validator nodes play a crucial role in maintaining the security and integrity of a blockchain. By confirming the legitimacy of transactions and thwarting fraudulent activities, they help prevent attacks or breaches that could compromise the network. In certain blockchain networks, validator nodes may also receive cryptocurrency or other incentives as rewards for their efforts.

### How do validator nodes work?

Validator nodes function by participating in a consensus protocol, which is a process that allows the network to reach an agreement on the validity of transactions. There are several types of consensus protocols, such as proof-of-work (PoW), proof-of-stake (PoS), delegated proof-of-stake (dPoS), proof-of-authority (PoA), and more...

VANAR is poised to employ a hybrid consensus mechanism, primarily relying on Proof of Authority (PoA), complemented by a Proof of Reputation (PoR) mechanism to enhance network security. Validator nodes receive transactions from clients, verify their authenticity, and perform calculations to determine whether the transactions comply with the network's rules. If the transactions are valid, they are added to the blockchain. If they are not, they are discarded.

The role of a validator node is essential to maintaining the integrity of a blockchain network. By ensuring the authenticity of transactions and preventing fraudulent activities, validator nodes help to safeguard the network and its participants.

### Green Vanar

Vanar is very mindful about running all nodes and infra on carbon-free and green data centers as per [Google Cloud Platform](https://cloud.google.com/sustainability/region-carbon) guidelines. A Vanar Validator Node with a less than 90% score won't be accepted. We encourage node validators to run in a region with high CFE% (>90). To get more information you can read more about Green Vanar chain vision [here](https://vanarchain.com/en/blog/empowering-the-future-with-vanar-a-ceos-vision-for-a-green-fast-and-ai-driven-ecosystem.html).

### Pre-requisites to run a validator node

* Software: A Linux-based operating system Ubuntu 22.04 with a compatible architecture ( x86\_64).
* Network connection: A stable and high-speed 10 Gbps internet connection.
* Minimum Hardware Requirements: A reliable server with a minimum of 8 CPU cores, 32 GB RAM, and 500 GB storage.
* Recommended Hardware Requirements: A reliable server with a minimum of 16 CPU cores, 64 GB RAM, and 1 TB storage.
* Preferred Region (low Carbon Data Centers): -
  * US (Lowa)
  * Europe: London, Finland

### Setting up a new node: -

#### Step 1: Choose the blockchain network

1. The blockchain network you are participating in is Vanarchain.
2. Ensure you understand the network's architecture, consensus algorithm, and validators' roles.
3. Familiarize yourself with the network's documentation, technical specifications, and community resources.

#### Step 2: Set up the environment

1. Install a Linux-based operating system Ubuntu 22.04 with a compatible architecture (x86\_64).
2. Configure the network settings, DNS, and firewall rules to allow port 30311 tcp/udp incoming connections.
3. Install [go](https://go.dev/) - version should 1.20.14

#### Step 3: Install dependencies and source code

1. Install the required dependencies, such as:

* git (for cloning the blockchain's repository)
* make (for building the blockchain's binary)
* gcc (for compiling the blockchain's code)

2. Clone the blockchain's repository using git clone:

&#x20;`git clone https://github.com/VanarChain/vanarchain-blockchain.git`

&#x20;This is the URL of the GitHub repository. It points to a specific directory within the repository.

3. Change into the cloned repository directory:

&#x20;`cd vanarchain-blockchain`

* cd: This is a command that changes the current directory to a new location.
* vanarchain-blockchain: This is the name of the repository, which is also the directory name.

4. “git checkout v1.1.1”: Latest tag Sep 2024. You can see the the available versions at <https://github.com/VanarChain/vanarchain-blockchain/tags> and you should use the latest available version.
5. Run the make command to build the blockchain's binary:

&#x20;`make all`

6. Copies the geth file from the build directory to the parent directory. Copies the bootnode file from the build directory to the parent directory. Changes the current directory to the parent directory.

`cp ./build/bin/geth  /usr/bin/geth`

* cp ./build/bin/geth  /usr/bin/geth: This is a command that copies a file from one location to another. It is executed as follows:
  * cp: This is the command that stands for "copy".
  * ./build/bin/geth: This is the source file to be copied. The ./ before build indicates that the directory is relative to the current directory.
  * /usr/bin/geth: This is the destination directory and filename where the file will be copied to. /usr/bin is a standard directory on Unix-like systems where executable programs are typically stored. geth is the name of the file to which the geth file will be copied.

So, this command copies the geth file from the build directory to the parent directory.

#### Step 4: Join the network

1. Connect to the network by establishing connections with other nodes (peers) and broadcasting your node's presence.
2. Validate transactions and blocks as a validator, following the network's consensus algorithm.

### Account creation commands

To create a new account on the Vanar network using the Geth command-line tool, follow these steps:

#### Step 1: Create a new directory for your node

Create a new directory to store the blockchain data and other files:

`mkdir /node`

#### Step 2: Creating a new account

Open a terminal or command prompt and run the following command:

`/usr/bin/geth --datadir /node/ account new`

This is a command that creates a new Vanar account using the Geth (Go Ethereum) command-line tool. Here's a breakdown of the command:

* /usr/bin/geth: This is the command to run the Go-Ethereum (Geth) client, which we use for Vanar node implementation.
* \--datadir /node/: This is an option for Geth that specifies the directory where the node's data files will be stored. In this case, the value is /node/.
* account new: This option tells Geth to create a new Vanar account. The account option is followed by the new keyword, which indicates that a new account should be created.

When you run this command, Geth will create a new Vanar account and store the account's private key and other relevant information in the node/ directory. The account will be created with a new address and a balance of 0 Vanar. The same address shall be copied as the coinbase address in Geth Commands. Here's an example of what the output might look like: -.

`I0900 22:30:45.551125 account/new.go:55] New account created with address0x72d5a5f4a7a5f4a5a5a5a5a5a5a5a5a5a5a5a5a5a5a`

#### Step 3: Storing the address (optional)

You can store the address (referred to as coinbase address) in a text file to be used later. It is an optional thing to be done.

echo 'node1: \<enter public address>' >> accounts.txt

This is a command that appends a line to a file using the echo command and redirects the output to a file. Here's a breakdown of the command:

* echo: This is a built-in command that prints its arguments to the console.
* 'node1: \<enter public address>': This is the string that will be printed to the console and appended to the file. The \<enter public address> part is a prompt for the user to input the public address.
* \>> accounts.txt: This is the redirection operator that appends the output of the echo command to the file accounts.txt. The >> symbol means "append to the end of the file". If the file doesn't exist, it will be created. If the file does exist, the new line will be appended to the end of the file.

This command is often used in scripting and automation tasks where you need to store public addresses or other data in a file. In this case, we are using it to store the public addresses of nodes in a file named accounts.txt.

#### Step 4: Storing the password

`echo 'your password' > /node/password.txt`

This is a command that writes a string to a file using the echo command and redirects the output to a file. Here's a breakdown of the command: -

* echo: This is a built-in command that prints its arguments to the console.
* 'your password': This is the string that will be printed to the console and written to the file. The string is a placeholder for the actual password.
* \> node/password.txt: This is the redirection operator that writes the output of the echo command to the file node/password.txt. The > symbol means "write to the file". If the file doesn't exist, it will be created. If the file does exist, the new content will overwrite the existing content.

When you run this command, the echo command will print the string 'your password' to the console and write it to the file node/password.txt. The file will contain the string of your password in plain text.

Security Warning: It's not recommended to store passwords in plain text files, as this can be a security risk. It's better to store passwords securely using a password manager or a secure storage mechanism.

#### Step 5: Use your new account

You can now use your new Vanar account to send and receive Vanry and other Vanar-based tokens. To do so, you'll need to configure your Geth node to connect to the Vanar network and participate in the consensus mechanism.

Remember to keep your private key secure and never share it with anyone. Losing access to your private key can result in the theft of your Vanar funds.

### Running a new node

To run a node on the Vanar network using the Geth command-line tool write the following code.

`/usr/bin/geth --vanar --datadir <node_dir> --syncmode <syncmode> --port <port> --txpool.rejournal <rejournal_interval> --txpool.globalslots <globalslots> --unlock <coinbase_address> --password <password_file> --mine --miner.etherbase <coinbase_address>`

* /usr/bin/geth: This part of the command specifies the location of the Geth binary (the executable file) on your system.
* \--vanar: This flag enables the experimental "Vanar" feature in Geth.
* \--datadir \<node\_dir>: The --datadir flag specifies the directory where Geth will store its data, which is typically in a folder called "node\_dir".
* \--syncmode \<syncmode>: The --syncmode flag specifies the type of syncing mode to be used by Geth. The possible values are:
  * "fast": Fast sync mode, which downloads block headers and state root hashes, but not state data, allowing for a faster initial sync.
  * "full": Full sync mode, which downloads all block data, including transactions and receipts, as well as state data.
  * "light": Light sync mode, which uses a server to retrieve block headers, transactions, and receipts, but not state data.
* \--port \<port>: The --port flag specifies the port number on which Geth will listen for incoming connections.
* \--txpool.rejournal \<rejournal\_interval>: The --txpool.rejournal flag sets the interval (in seconds) at which the transaction pool is persisted to disk.
* \--txpool.globalslots \<globalslots>: The --txpool.globalslots flag specifies the size of the global transaction pool.
* \--unlock \<coinbase\_address>: The --unlock flag unlocks the specified coinbase account, allowing it to be used for mining.
* \--password \<password\_file>: The --password flag specifies the location of the password file used to unlock the coinbase account.
* \--mine: The --mine flag instructs Geth to start mining blocks.
* \--miner.etherbase \<coinbase\_address>: The --miner.etherbase flag specifies the coinbase account to use for mining rewards.

### Attaching Geth to running node

&#x20;`/usr/bin/geth attach /node/geth.ipc`

This is a command that attaches to a running Geth node using the geth command-line tool. Here's a breakdown of the command:

* /usr/bin/geth: This is the command-line tool for interacting with the Vanar node.
* attach: This option tells the geth command to attach to an existing node rather than starting a new node.
* /node/geth.ipc: This is the Unix domain socket file that connects to the existing node. The geth.ipc file is used to communicate with the node.

### Verify the node

Verify that the node is running and syncing with the Vanar network. To become a validator please reach out to the Vanar team and share your account public address.


# GroV

We’re excited to introduce GroV, Vanar's new community engagement platform designed to reward our amazing users! With GroV, you can:

* Earn tokens by completing interactive quests
* Explore a variety of exciting projects
* Access unique, top-tier rewards

We're paving the way for a new era of community engagement, making it fun and rewarding for everyone.

<br>


# Frequently Asked Questions

**How do I log in?**

Go to [grov.vanarchain.com](https://grov.vanarchain.com/), and simply connect your wallet to Vanar GroV!

**I completed my quest but can’t claim my rewards, why?**

It may take 15–20 minutes for Vanar GroV to verify your completed task on the respective platform (e.g., X).

**I completed the “Add Vanar Network to Brillion Wallet” quest but don’t see the Claim button, why?**

Kindly wait 5-10 minutes after adding the wallet, and refresh the page.

**What are Loyalty Points, Token Points, and Cash Points?**

* **LP - Loyalty Points**: Users earn LP from quests whose rewards can be claimed from the rewards marketplace.
* **TP - Token Points**: Users earn TP from quests that reward crypto tokens. These rewards are airdropped after the campaign ends.
* **CP - Cash Points**: Users earn TP from quests that reward cash. These rewards are airdropped after the campaign ends.

**How can I use the Loyalty points earned from quests?**

You’ll be able to redeem Loyalty points in our marketplace for items like lottery tickets, NFTs, and other prize pool items.

**What are lottery tickets?**

Lottery tickets provide access to various raffles hosted in the marketplace. If you win, your rewards will be airdropped to your wallet.

**Which browsers and devices are supported?**

Our platform supports all modern browsers like Chrome, Firefox, Safari, and Edge, and works on desktops, laptops, tablets, and smartphones. For the best experience, use the latest browser version.

**When does the Brillion campaign end?**

End of December

**When can I expect to receive the rewards from campaigns with token airdrops?**

Once the campaign ends, the tokens will be airdropped within 1-2 weeks.

**Who do I contact if I need help?**

Discord: <https://discord.gg/xP7BfrzfYc>

Email: <support@vanarchain.com>